- Forums
- Product Forums
- General Purpose MicrocontrollersGeneral Purpose Microcontrollers
- i.MX Forumsi.MX Forums
- QorIQ Processing PlatformsQorIQ Processing Platforms
- Identification and SecurityIdentification and Security
- Power ManagementPower Management
- MCX Microcontrollers
- S32G
- S32K
- S32V
- MPC5xxx
- Other NXP Products
- Wireless Connectivity
- S12 / MagniV Microcontrollers
- Powertrain and Electrification Analog Drivers
- Sensors
- Vybrid Processors
- Digital Signal Controllers
- 8-bit Microcontrollers
- ColdFire/68K Microcontrollers and Processors
- PowerQUICC Processors
- OSBDM and TBDML
- S32M
-
- Solution Forums
- Software Forums
- MCUXpresso Software and ToolsMCUXpresso Software and Tools
- CodeWarriorCodeWarrior
- MQX Software SolutionsMQX Software Solutions
- Model-Based Design Toolbox (MBDT)Model-Based Design Toolbox (MBDT)
- FreeMASTER
- eIQ Machine Learning Software
- Embedded Software and Tools Clinic
- S32 SDK
- S32 Design Studio
- GUI Guider
- Zephyr Project
- Voice Technology
- Application Software Packs
- Secure Provisioning SDK (SPSDK)
- Processor Expert Software
- MCUXpresso Training Hub
-
- Topics
- Mobile Robotics - Drones and RoversMobile Robotics - Drones and Rovers
- NXP Training ContentNXP Training Content
- University ProgramsUniversity Programs
- Rapid IoT
- NXP Designs
- SafeAssure-Community
- OSS Security & Maintenance
- Using Our Community
-
- Cloud Lab Forums
-
- Knowledge Bases
- ARM Microcontrollers
- i.MX Processors
- Identification and Security
- Model-Based Design Toolbox (MBDT)
- QorIQ Processing Platforms
- S32 Automotive Processing Platform
- Wireless Connectivity
- CodeWarrior
- MCUXpresso Suite of Software and Tools
- MQX Software Solutions
-
- Home
- :
- NXP Tech Blog
- :
- Tutorial: MCUXpresso SDK with Linux, Part 1: Installation and Build with Make
Tutorial: MCUXpresso SDK with Linux, Part 1: Installation and Build with Make
Tutorial: MCUXpresso SDK with Linux, Part 1: Installation and Build with Make
- RSS フィードを購読する
- 新着としてマーク
- 既読としてマーク
- ブックマーク
- 購読
- 印刷用ページ
- 不適切なコンテンツを報告
I admit: my work laptop machine is running a Windows 10 OS by default. But this does not prevent me running Linux in a Virtual Machine (VM). Each host platform has its benefits, and I don’t feel biased to one or the other, but I have started using Ubuntu more and more, simply because I have worked more on Embedded Linux projects. While I have used mostly Windows with Eclipse for NXP LPC, Kinetis and i.MX platforms in the past, I started using Ubuntu too from last year with the NXP MCUXpresso SDK. I did not find much documentation about this on the web, so I thought it might be a good idea to write a tutorial about it. So here we go…
Outline
This tutorial shows how to install and develop on Linux with the NXP MCUXpresso SDK. It goes through the steps all the needed pieces and to build one of the SDK example projects.
If you want to develop the easy way with MCUXpesso SDK using a GUI: The MCUXpresso IDE (Eclipse based) runs on Ubuntu (and Windows and Mac) too. This article uses make files and no GUI for a ‘headless’ or ‘GUI-less’ environment.
This is what I’m using in this tutorial:
- Oracle VirtualBox V6.0.4 from https://www.virtualbox.org/
- Ubuntu 18.0.4 LTS: https://www.ubuntu.com/download/desktop
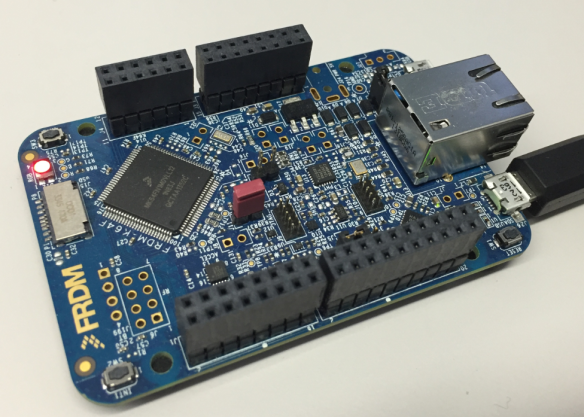
- NXP FRDM-K64F Board: https://www.nxp.com/freedom
- NXP MCUXpresso SDK V2.5.0 for FRDM-K64F: https://mcuxpresso.nxp.com
- GNU Toolchain for ARM gcc-arm-none-eabi-8-2018-q4-major: https://developer.arm.com/tools-and-software/open-source-software/developer-tools/gnu-toolchain/gnu-...
- cmake version 3.10.2:
Linux Host
I recommend using Ubuntu Linux. I’m using it in a VM (Virtual Machine) on Windows 10 with the Oracle VirtualBox. There are plenty of tutorials available on the internet about installing Ubuntu on VirtualBox if you are not familiar with it.
NXP MCUXpresso SDK
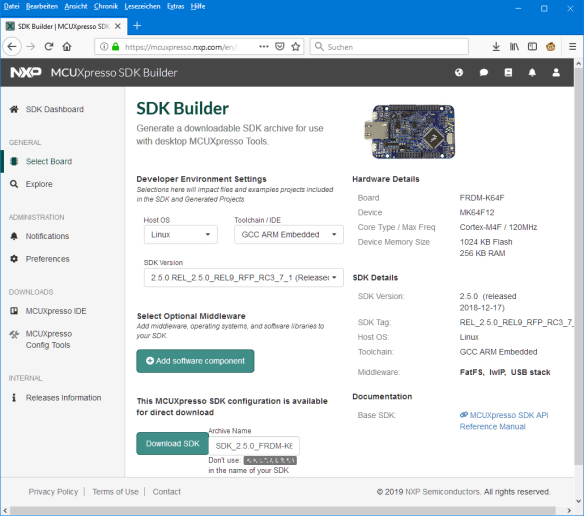
Select and configure the SDK on https://mcuxpresso.nxp.com. The important part is to select Linux as Host OS and GCC ARM Embedded as toolchain:
Then click on ‘Download SDK’ and download the archive to the user home directory and extract it there in a subdirectory:
$ cd ~ $ mkdir MCUXpresso $ cd MCUXpresso $ mkdir SDK_2.5.0_FRDM-K64F $ cd SDK_2.5.0_FRDM-K64F
Place the SDK .tar.gz file into that created folder. Unzip the downloaded SDK file:
$ gunzip SDK_2.5.0_FRDM-K64F.tar.gz
Then untar the archive:
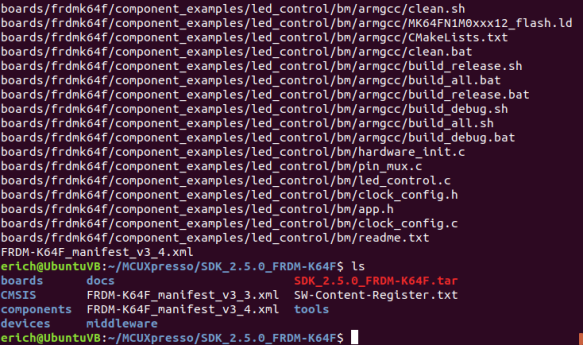
tar -xvf SDK_2.5.0_FRDM-K64F.tar
Installing CMake
By default the SDK is using CMake and not directly normal make files. As CMake is not installed by default in my Ubuntu distribution, I have to add it:
$ sudo apt install cmake
CMake is a cross-platform make file *generator*. As with the make file syntax, it takes some time to learn using. To learn more about CMake: there are plenty of resources available online, a good starting point is https://cmake.org/.
I’m using cmake 3.10.2. The SDK documentation recommends using an older version 3.0.x. Using the 3.10 version will show warnings like ‘The CMAKE_FORCE_C_COMPILER macro is deprecated. Instead just set CMAKE_C_COMPILER and allow CMake to identify the compiler.’ because the SDK cmake files are not compatible with newer cmake versions. The warnings are annoying, but do not affect the functionality so they can be ignored.
Installing GNU ARM Toolchain for Embedded
To develop with the SDK, I have to install a cross toolchain, available from https://developer.arm.com/tools-and-software/open-source-software/developer-tools/gnu-toolchain/gnu-...
I don’t want to have the toolchain installed for everyone on my Linux, so I install it locally into a ‘opt’ folder inside my user home directory:
The reason for this is to separate different GNU ARM Embedded Toolchains for different projects. If I would add it to the global path/system, separation would be very difficult.
$ mkdir ~/opt $ cd ~/opt
The current release is gcc-arm-none-eabi-8-2018-q4-major-linux.tar.bz which I download with
$ wget https://developer.arm.com/-/media/Files/downloads/gnu-rm/8-2018q4/gcc-arm-none-eabi-8-2018-q4-major-...
unzip the archive:
$ tar xjf gcc-arm-none-eabi-8-2018-q4-major-linux.tar.bz2
Finally change the permissions to read-only:
$ chmod -R -w "${HOME}"/opt/gcc-arm-none-eabi-7-2017-q4-major
Verify that the compiler is working:
$ ~/opt/gcc-arm-none-eabi-8-2018-q4-major/bin/arm-none-eabi-gcc --version
which returns the following:
arm-none-eabi-gcc (GNU Tools for Arm Embedded Processors 8-2018-q4-major) 8.2.1 20181213 (release) [gcc-8-branch revision 267074] Copyright (C) 2018 Free Software Foundation, Inc. This is free software; see the source for copying conditions. There is NO warranty; not even for MERCHANTABILITY or FITNESS FOR A PARTICULAR PURPOSE.
CMake Environment
CMake needs a variable set to find the compiler. This can be done with
$ export ARMGCC_DIR=~/opt/gcc-arm-none-eabi-8-2018-q4-major
To make it permanent for the user, it can be added to the ~/.bashrc file:
$ nano ~/.bashrc
And then add it to the file which gets executed every time I log in as this user.
Use CTRL+X to exit nano and to save the file.
Building Example SDK Projects
In the next step I’m going to build one of the example projects: the LED Blinky one:
$ cd ~/MCUXpresso/SDK_2.5.0_FRDM-K64F/boards/frdmk64f/demo_apps/led_blinky/armgcc
This folder contains several *.bat files (left-over from the Windows world?). Relevant are the Shell script *.sh script files:
- clean.sh: used to clean the build files
- build_release.sh: generate make file for a release build
- build_debug.sh: generate make file for a debug build
- build_all.sh: build a make file for release and debug build
The shell script to generate the make file are using cmake (see above) with all the necessary information for cmake in the CMakeLists.txt file.
To build a make file for both debug version:
$ ./build_debug.sh
Beside of generating the make file, it generates the binary too in the ‘debug’ output folder:
With the ‘file’ command I can verify that indeed the correct binary has been produced:
$ file debug/led_blinky.elf
Because CMake has generated all the needed make files, I can now build the project with
$ make
To clean it I can use
$ make clean
that’s it
Summary
With this tutorial I showed the installation of the necessary tools (SDK, cmake, GNU ARM for Embedded toolchain) and how to build example projects.
In a next part I’ll touch on the debugging part with gdb. Until then, I hope you find this one useful.
Happy Linuxing
Links
- Oracle VirtualBox: https://www.virtualbox.org/
- Ubuntu Linux: https://www.ubuntu.com
- NXP MCUXpresso SDK web site: https://mcuxpresso.nxp.com
- NXP FRDM-K64F Board: https://www.nxp.com/support/developer-resources/evaluation-and-development-boards/freedom-developmen...
- GNU Toolchain for ARM Embedded: https://developer.arm.com/tools-and-software/open-source-software/developer-tools/gnu-toolchain/gnu-...
- CMake: https://cmake.org/
- MCUXpresso IDE: http://www.nxp.com/mcuxpresso/ide
- - -
Originally published on April 14, 2019 by Erich Styger
ここにコメントを追加するには、ご登録いただく必要があります。 ご登録済みの場合は、ログインしてください。 ご登録がまだの場合は、ご登録後にログインしてください。
-
101
6 -
communication standards
4 -
General Purpose Microcontrollers
23 -
i.MX RT Processors
46 -
i.MX Processors
49 -
Interface
1 -
introduction
13 -
LPC Microcontrollers
73 -
MCUXpresso
34 -
MCUXpresso Secure Provisioning Tool
1 -
MCUXpresso Conig Tools
30 -
MCUXpresso IDE
42 -
MCUXpresso SDK
26 -
Model-Based Design Toolbox
6 -
MQX Software Solutions
2 -
QorIQ Processing Platforms
1 -
QorIQ Devices
5 -
S32N Processors
4 -
S32Z|E Processors
6 -
SW | Downloads
7 -
日本語ブログ
5
- « 前へ
- 次へ »


