
- Forums
- Product Forums
- General Purpose MicrocontrollersGeneral Purpose Microcontrollers
- i.MX Forumsi.MX Forums
- QorIQ Processing PlatformsQorIQ Processing Platforms
- Identification and SecurityIdentification and Security
- Power ManagementPower Management
- Wireless ConnectivityWireless Connectivity
- RFID / NFCRFID / NFC
- Advanced AnalogAdvanced Analog
- Neural Processing UnitsNeural Processing Units
- MCX Microcontrollers
- S32G
- S32K
- S32V
- MPC5xxx
- Other NXP Products
- S12 / MagniV Microcontrollers
- Powertrain and Electrification Analog Drivers
- Sensors
- Vybrid Processors
- Digital Signal Controllers
- 8-bit Microcontrollers
- ColdFire/68K Microcontrollers and Processors
- PowerQUICC Processors
- OSBDM and TBDML
- S32M
- S32Z/E
-
- Solution Forums
- Software Forums
- MCUXpresso Software and ToolsMCUXpresso Software and Tools
- CodeWarriorCodeWarrior
- MQX Software SolutionsMQX Software Solutions
- Model-Based Design Toolbox (MBDT)Model-Based Design Toolbox (MBDT)
- FreeMASTER
- eIQ Machine Learning Software
- Embedded Software and Tools Clinic
- S32 SDK
- S32 Design Studio
- GUI Guider
- Zephyr Project
- Voice Technology
- Application Software Packs
- Secure Provisioning SDK (SPSDK)
- Processor Expert Software
- Generative AI & LLMs
-
- Topics
- Mobile Robotics - Drones and RoversMobile Robotics - Drones and Rovers
- NXP Training ContentNXP Training Content
- University ProgramsUniversity Programs
- Rapid IoT
- NXP Designs
- SafeAssure-Community
- OSS Security & Maintenance
- Using Our Community
-
- Cloud Lab Forums
-
- Knowledge Bases
- ARM Microcontrollers
- i.MX Processors
- Identification and Security
- Model-Based Design Toolbox (MBDT)
- QorIQ Processing Platforms
- S32 Automotive Processing Platform
- Wireless Connectivity
- CodeWarrior
- MCUXpresso Suite of Software and Tools
- MQX Software Solutions
- RFID / NFC
- Advanced Analog
- Neural Processing Units
-
- NXP Tech Blogs
- Home
- :
- MCUXpressoソフトウェアとツール
- :
- MCUXpressoコンフィグツール
- :
- LPC55xx: enable clock source for flexcomm interface USART CMSIS
LPC55xx: enable clock source for flexcomm interface USART CMSIS
- RSS フィードを購読する
- トピックを新着としてマーク
- トピックを既読としてマーク
- このトピックを現在のユーザーにフロートします
- ブックマーク
- 購読
- ミュート
- 印刷用ページ

- 新着としてマーク
- ブックマーク
- 購読
- ミュート
- RSS フィードを購読する
- ハイライト
- 印刷
- 不適切なコンテンツを報告
Hello,
running MCUXpresso IDE 25.06 with SDK 25.06 for LPC5536. I use Config Tools to to configure hardware interfaces of a new project created with "new project wizard".
I start with Clocks Tool to configure the CPU clock to 100 MHz.
Next I use Peripherals Tool to configure Flexcom0 as USART (CMSIS universal drivers). When I add this interface, the configuration page correctly indicates an error: "clock source is not configured". It also give me a quick hint with the possibility to enable FXCOM0 clock:

I select "Enable FXCOM0 clock" and then the error indicator disappears.
I click on "update code". This closes the Peripherals window and returns me to the Develop view.
Now I open Clocks Tool in order to change the clock routing for FXCOM0 clock.
You can see that "FXCOMCLK0" clock is enabled:

There, I change FCCCLKSEL0 from "main_clk" to "system_pll_divided_clock. This disables FXCOMCLK0.
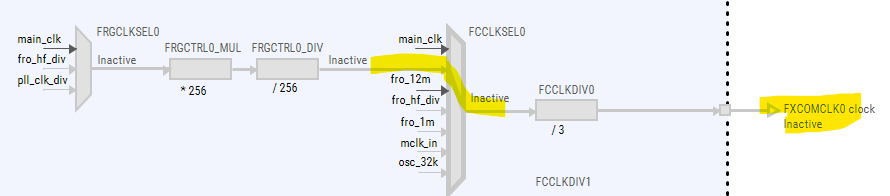
After clicking "update code", I open Peripherals Tool again.
There, I'm greeted with the same error indicator as before, i.e., asserting (correctly) that Flexcom0 clock is not configured.
Again, I now use the "quick fix" from before to make the Peripherals tool enable the clock for me.
I open Clocks Tool and find that some components along the clock route are now enabeld that were disabled before:
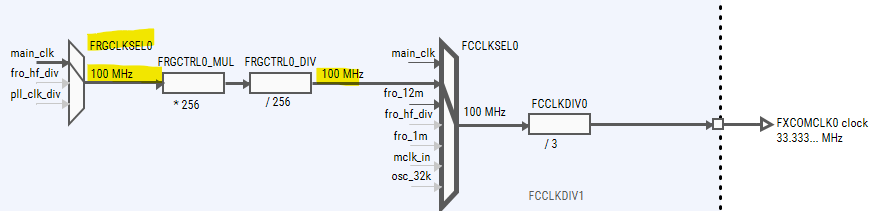
As before, I don't want to use the clock route to "main_clk" but instead to "pll_clk_div".
When switching to "pll_clk_div", FXCOMCLK0 gets disabled again. Arrrgghh.
I stop this ping pong game here. This is obviously not an efficient workflow to route a clock to an hardware interface. It takes too many hoops, switching back and forth between different Config Tools.
So I route the clock starting at the oscillator. This works until I hit PLLDIV.
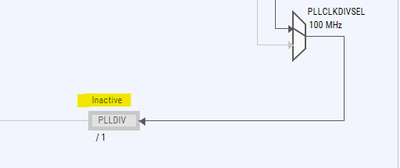
This element is disabled and I have no idea how to enable it. I try double clicking it, the name, the divider, the "inactive" text but to no avail.
I finally right clicked the element and selected "Edit the setting of: PLLDIV". There, I try to enter a "PLLDIV Frequency" but I'm only greeted with an error window popping up claming that the element is disabled. Desperate, I clicked on "Halt the divider counter" and selected "enable the divider counter".
Can you believe it, this enabled the route. 🤷
The Clocks Tool is really inconvenient and not intuitive in this regard. It should provide a "quick fix" to enable any component easily. This would be helpful.
解決済! 解決策の投稿を見る。

 EdwinHz
- 新着としてマーク
- ブックマーク
- 購読
- ミュート
- RSS フィードを購読する
- ハイライト
- 印刷
- 不適切なコンテンツを報告
Hi @danielholala,
I'm using the latest version of ConfigTools for MCUXpresso IDE, which is 25.6.136.
That said, I will forward your message to the ConfigTools team as a valuable suggestion.
EdwinHz
- 新着としてマーク
- ブックマーク
- 購読
- ミュート
- RSS フィードを購読する
- ハイライト
- 印刷
- 不適切なコンテンツを報告
Hi @danielholala,
I understand the frustration caused by ConfigTools, that at times, when "fixing" something it might "break" something else. The thing is, using the "quick fix" options that ConfigTools prompts provides just that, a quick and easy fix to the clock initialization problem in this case. I understand that you do not wish to use the main CPU clock for this case, but that is, in this case, the quickest and easiest fix that ConfigTools can provide. If you want to do more nuance configurations, then a manual setup is required.
BR,
Edwin.
- 新着としてマーク
- ブックマーク
- 購読
- ミュート
- RSS フィードを購読する
- ハイライト
- 印刷
- 不適切なコンテンツを報告
Thank you, @EdwinHz, for you reply. I understand that the "quick fix" cannot know which clock source I want to use. That is therefore not my main gripe.
My main gripe is about enabling a clock divider, for example PLLDIV:

I could not find a way to enable it on the clocks diagram with the mouse. That was a frustrating experience.
Is there a way to enable it by operating with the mouse on it?
If not, I suggest to add one.
Thanks
Daniel
EdwinHz
- 新着としてマーク
- ブックマーク
- 購読
- ミュート
- RSS フィードを購読する
- ハイライト
- 印刷
- 不適切なコンテンツを報告
Hi @danielholala,
When clicking on any of these divider blocks, you will see that the "Details" window on the right will change to reflect the possible changes of that block. Therefore, the editing process is to click the block, and then enable it by setting a frequency on the "Details" window:

Also, you can right click the block and select "Edit the settings of: PLLDIV" in this case, like you mentioned before on your post. This way, a pop-up window will appear with all of the same setting as the Detail window from before:

BR,
Edwin
- 新着としてマーク
- ブックマーク
- 購読
- ミュート
- RSS フィードを購読する
- ハイライト
- 印刷
- 不適切なコンテンツを報告
Dear @EdwinHz ,
you suggest to enter a frequency to enable a divider. That would be intuitive, I agree.
I tried this but it does not work for me. If I enter a frequency, I a warning window pops up telling me that the divider is disabled, see screenshot:

I think it would be intuitive to enable the divider when I enter a frequency or modify the divider value (e.g., by just clicking below the element on the text "/1").
I hope that the Config Tools team will address this issue in an future update.
EdwinHz
- 新着としてマーク
- ブックマーク
- 購読
- ミュート
- RSS フィードを購読する
- ハイライト
- 印刷
- 不適切なコンテンツを報告
Hi @danielholala,
In that specific case, you need to enable CTIMER4 clock first in order to modify the value of CTIMER4CLKDIV:

Considering that the output of the divider is directly the CTIMER4 clock, perhaps it should also enable it from the configuration of the CTIMER4CLKDIV, as you mention. I will pass this request to the ConfigTools team so they can evaluate its implementation.
BR,
Edwin.
- 新着としてマーク
- ブックマーク
- 購読
- ミュート
- RSS フィードを購読する
- ハイライト
- 印刷
- 不適切なコンテンツを報告
Dear EdwinHz, Thank you for getting back to me.
Do you have a different Clocks tool version than me? I cannot enable CTIMER4 clock with the CTIMER4CLKDIV disabled. And that makes sense to me. I think it's good practice to route clocks from the source (oscillator) to the destination component (e.g, CTIMER4 clock). In the big picture, from left to right.
I am convinced that the user experience can be clearly and critically improved when a clock divider gets enabled automatically as soon as I select a frequency for it or change the divider value in the "Clocks diagram".
I hope you can forward my suggestion to the ConfigTools team.
Thanks.
Daniel
 marek_neuzil
- 新着としてマーク
- ブックマーク
- 購読
- ミュート
- RSS フィードを購読する
- ハイライト
- 印刷
- 不適切なコンテンツを報告
Hello @danielholala ,
I have checked your use case and the issues you have reported. The Enable FXCOM0 clock functionality that is provided in Peripherals tool is just shortcut for Clocks tool. The Clocks tool provides the same functionality for each top level output in the clock diagram:

Your use-case can be processed in the Clocks tool without switching the tools. The context menu of each top level output contains the Enable command. This functionality just makes the clock enabled by enabling clock gates, dividers, and other elements on the clock path. Your specific requirements must be processed by manual selection of the clock sources and selection of the PLL mode, configuration of the external clock sources (external clocks sources/crystals must also be specified manually according to connection of the board).
For example, in the case you want to use Enable FXCOM0 clock command you can do it this way:
When the main_clk of the FCCLKSEL0 is selected, select the system PLL divided clock and click on the Enable FXCOM0 clock.

Then the main_clk is selected (because this is the only active clock source of the FRGCLKSEL0) and you must select the pll_clk_div as you want to use the PLL output.
When you process the Enable FXCOM0 clock command again, see below:

The PLLDIV divider is enabled:

Please note, that the PLL itself is not used, the PLL is bypassed because the PLL is not configured. It provides two functional modes and other settings that must be specified.

When you for example select the Normal mode the PLL is enabled and 384 MHz frequency is set.

If the board use a crystal, for example 16 MHz, you must set it including capacitors and mode of operation in the XTAL clock source Details settings:

You can select the external clock source and source clock for the PLL:
A clock gate is disabled so you can enable it manually in the Details view setting (click on the element).

Select the Enabled and clocked value:

You can also specify the output frequency in the clock diagram:

And the clock tool selects possible clock dividers and provide the settings to satisfy the requirement:

The selection of the required frequency cause also the lock of the frequency output (the lock icon in the diagram near to the frequency).
If you require a frequency that cannot be achieved using existing clock path (for example 30 MHz of the FXCOMCLK2) the Advance resolver for the FXCOM2 clock can be used:

It provides more complex analysis of the possible clock paths and try to find a possible solution for all requirements and locked settings. In this case it change settings of the main clock and PLL frequency:

The Clocks tool provides advanced support for the complex clock models of modern MCUs that provide many variations of clock paths settings for all peripherals and system modules and sometimes it requires more advanced user configuration for specific requirements.
If you still see any issue or improvement do hesitate to contact me. We are still working on the new features and improvement for customers in next versions of the Config tools.
Best Regards,
Marek Neuzil
- 新着としてマーク
- ブックマーク
- 購読
- ミュート
- RSS フィードを購読する
- ハイライト
- 印刷
- 不適切なコンテンツを報告
Hello @marek_neuzil ,
Brilliant! Thanks a lot for taking the time to write such a detailed and comprehensive answer. I really appreciate the depth you went into.
For my next project, I'll definitely try the steps you described.
Best regards,
Daniel
EdwinHz
- 新着としてマーク
- ブックマーク
- 購読
- ミュート
- RSS フィードを購読する
- ハイライト
- 印刷
- 不適切なコンテンツを報告
Hi @danielholala,
I'm using the latest version of ConfigTools for MCUXpresso IDE, which is 25.6.136.
That said, I will forward your message to the ConfigTools team as a valuable suggestion.
