
- Forums
- Product Forums
- General Purpose MicrocontrollersGeneral Purpose Microcontrollers
- i.MX Forumsi.MX Forums
- QorIQ Processing PlatformsQorIQ Processing Platforms
- Identification and SecurityIdentification and Security
- Power ManagementPower Management
- Wireless ConnectivityWireless Connectivity
- RFID / NFCRFID / NFC
- Advanced AnalogAdvanced Analog
- Neural Processing UnitsNeural Processing Units
- MCX Microcontrollers
- S32G
- S32K
- S32V
- MPC5xxx
- Other NXP Products
- S12 / MagniV Microcontrollers
- Powertrain and Electrification Analog Drivers
- Sensors
- Vybrid Processors
- Digital Signal Controllers
- 8-bit Microcontrollers
- ColdFire/68K Microcontrollers and Processors
- PowerQUICC Processors
- OSBDM and TBDML
- S32M
- S32Z/E
-
- Solution Forums
- Software Forums
- MCUXpresso Software and ToolsMCUXpresso Software and Tools
- CodeWarriorCodeWarrior
- MQX Software SolutionsMQX Software Solutions
- Model-Based Design Toolbox (MBDT)Model-Based Design Toolbox (MBDT)
- FreeMASTER
- eIQ Machine Learning Software
- Embedded Software and Tools Clinic
- S32 SDK
- S32 Design Studio
- GUI Guider
- Zephyr Project
- Voice Technology
- Application Software Packs
- Secure Provisioning SDK (SPSDK)
- Processor Expert Software
- Generative AI & LLMs
-
- Topics
- Mobile Robotics - Drones and RoversMobile Robotics - Drones and Rovers
- NXP Training ContentNXP Training Content
- University ProgramsUniversity Programs
- Rapid IoT
- NXP Designs
- SafeAssure-Community
- OSS Security & Maintenance
- Using Our Community
-
- Cloud Lab Forums
-
- Knowledge Bases
- ARM Microcontrollers
- i.MX Processors
- Identification and Security
- Model-Based Design Toolbox (MBDT)
- QorIQ Processing Platforms
- S32 Automotive Processing Platform
- Wireless Connectivity
- CodeWarrior
- MCUXpresso Suite of Software and Tools
- MQX Software Solutions
- RFID / NFC
- Advanced Analog
- Neural Processing Units
-
- NXP Tech Blogs
- Home
- :
- ARM Microcontrollers
- :
- LPCマイクロコントローラ・ナレッジ・ベース
- :
- How to Change MCU with MCUXpresso
How to Change MCU with MCUXpresso
- RSS フィードを購読する
- 新着としてマーク
- 既読としてマーク
- ブックマーク
- 購読
- 印刷用ページ
- 不適切なコンテンツを報告
How to Change MCU with MCUXpresso
How to Change MCU with MCUXpresso
Recently I found some customers have a bit of problem when porting project from one MCU to another, so this article using simple steps demonstrates how to change MCU with MCUXpresso. There is also a video demonstrated the detail steps in attachment.
Pay attention, as MCUXpresso User Guide says: All projects are associated with a particular MCU at creation time. The target MCU determines the project memory layout, startup code, LinkServer flash driver, libraries, supporting sources,launch configuration options etc. etc. so changing a project’s associated MCU should not be undertaken unless you have a total grasp of the consequence of this change. Therefore rather than changing a project’s associated MCU, it is strongly recommended that instead a new project is generated for the desired MCU and this new project is edited as required.
However, on occasion it may be expedient to reset a project’s MCU (and associated SDK) and this can be achieved as follows. For example, changing lpc55s69 to lpc55s06, we need install SDKs for lpc55s69 and lpc55s06 before all the below steps.
1 - Change MCU & Package
1.1 – Change MCU
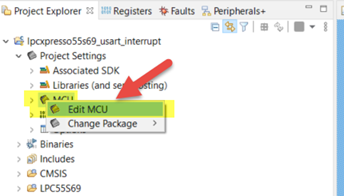
Right click “MCU” under Project tree, choose “Edit MCU”
Uncheck ”Preserve memory configuration”(it is checked by default)->choose LPC55S06->there is a warning, choose Yes.
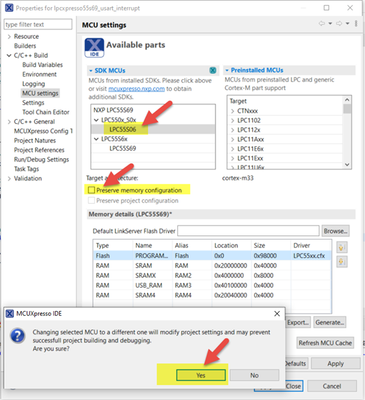
We can see the Memory details changed to lpc55s06, then click ”Apply and close”.
1.2 – Change Package
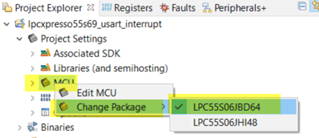
2 - Change Compiler Definitions
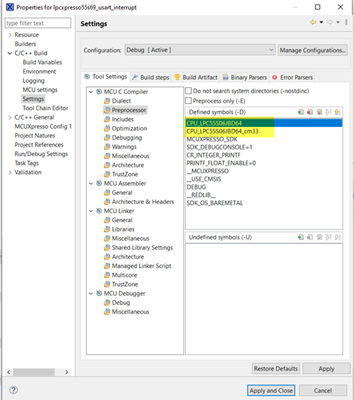
In Properties view->Settings->MCU Compiler ->Preprocessor, change the definition for CPU from LPC55S69JBD100 to LPC55S06JBD64 as below:
3 – Change/add SDK driver for LPC55s06
Selected project, then click ”Manage SDK components”, choose the drivers our application used, for example, clock, power, usart.

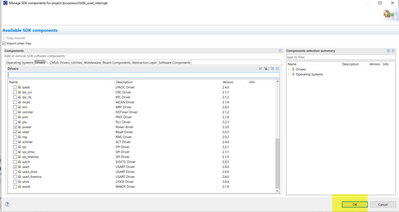
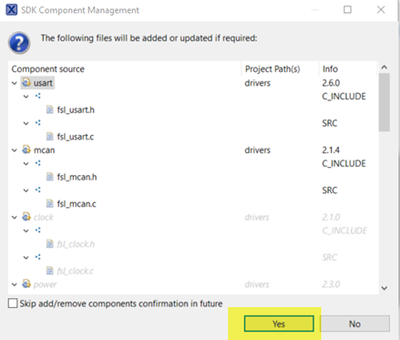
Click “OK”, then click “Yes” to update.
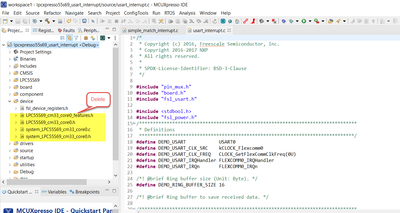
Delete LPC55S69 device related files:
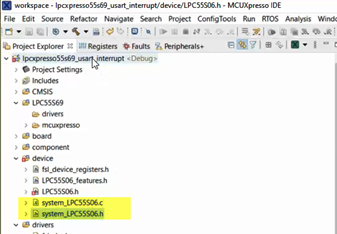
Add “system_LPC55S06.c” and “system_LPC55S06.h” files:
4 - Change startup file.
Delete LPC55s69 startup files, add “startup_lpc55s06.c”, we can find the startup file in any SDK demo.

5 - Change board related files.
Refer to our own new board, change files under “board” folder, for example pins, uart number, here directly copy from SDK demo for LPCxpresso55s06 board.
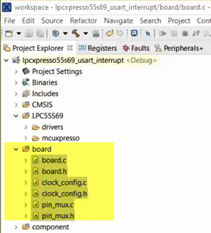
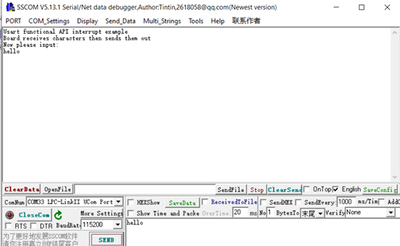
6 - Test the project function with new board
Build project until no compile error, download and run it, result as below.

- 既読としてマーク
- 新着としてマーク
- ブックマーク
- ハイライト
- 印刷
- 不適切なコンテンツを報告
Thanks for providing these instructions.
I my opinion: at least for switching the MCU to a compatible model within an mcu family (e.g., same device but with more memory), this process should be made a lot easier.
Also, whenever possible, keep the selected SDK components, see the "SDK components" issue here: also: https://community.nxp.com/t5/MCUXpresso-IDE/quot-Manage-SDK-Components-quot-stops-working-after-swit...
