
- Forums
- Product Forums
- General Purpose MicrocontrollersGeneral Purpose Microcontrollers
- i.MX Forumsi.MX Forums
- QorIQ Processing PlatformsQorIQ Processing Platforms
- Identification and SecurityIdentification and Security
- Power ManagementPower Management
- Wireless ConnectivityWireless Connectivity
- RFID / NFCRFID / NFC
- Advanced AnalogAdvanced Analog
- Neural Processing UnitsNeural Processing Units
- MCX Microcontrollers
- S32G
- S32K
- S32V
- MPC5xxx
- Other NXP Products
- S12 / MagniV Microcontrollers
- Powertrain and Electrification Analog Drivers
- Sensors
- Vybrid Processors
- Digital Signal Controllers
- 8-bit Microcontrollers
- ColdFire/68K Microcontrollers and Processors
- PowerQUICC Processors
- OSBDM and TBDML
- S32M
- S32Z/E
-
- Solution Forums
- Software Forums
- MCUXpresso Software and ToolsMCUXpresso Software and Tools
- CodeWarriorCodeWarrior
- MQX Software SolutionsMQX Software Solutions
- Model-Based Design Toolbox (MBDT)Model-Based Design Toolbox (MBDT)
- FreeMASTER
- eIQ Machine Learning Software
- Embedded Software and Tools Clinic
- S32 SDK
- S32 Design Studio
- GUI Guider
- Zephyr Project
- Voice Technology
- Application Software Packs
- Secure Provisioning SDK (SPSDK)
- Processor Expert Software
- Generative AI & LLMs
-
- Topics
- Mobile Robotics - Drones and RoversMobile Robotics - Drones and Rovers
- NXP Training ContentNXP Training Content
- University ProgramsUniversity Programs
- Rapid IoT
- NXP Designs
- SafeAssure-Community
- OSS Security & Maintenance
- Using Our Community
-
- Cloud Lab Forums
-
- Knowledge Bases
- ARM Microcontrollers
- i.MX Processors
- Identification and Security
- Model-Based Design Toolbox (MBDT)
- QorIQ Processing Platforms
- S32 Automotive Processing Platform
- Wireless Connectivity
- CodeWarrior
- MCUXpresso Suite of Software and Tools
- MQX Software Solutions
- RFID / NFC
- Advanced Analog
- Neural Processing Units
-
- NXP Tech Blogs
- Home
- :
- i.MX フォーラム
- :
- i.MXプロセッサ
- :
- Generating encrypted BEE bootable XIP image
Generating encrypted BEE bootable XIP image
- RSS フィードを購読する
- トピックを新着としてマーク
- トピックを既読としてマーク
- このトピックを現在のユーザーにフロートします
- ブックマーク
- 購読
- ミュート
- 印刷用ページ
Generating encrypted BEE bootable XIP image
- 新着としてマーク
- ブックマーク
- 購読
- ミュート
- RSS フィードを購読する
- ハイライト
- 印刷
- 不適切なコンテンツを報告
I have been trying to generate encrypted bootable XIP images for my MIMXRT1020 EVK.
1. Using MCUBootUtility
- I downloaded latest MCUBootUtility version from https://github.com/JayHeng/NXP-MCUBootUtility by @kerryzhou.
- I could not access the image_enc.exe in the Baidu server. (Honestly, it doesn't make sense to me why the file is not included in the github repo or placed at a more accessible location like Google Drive. If it's something official from NXP, I would expect it to be on NXP website. I came across multiple forum posts asking for the same file). In the end I managed to download it from this forum post: https://community.nxp.com/t5/i-MX-RT/image-enc2-zip-download/m-p/1174074
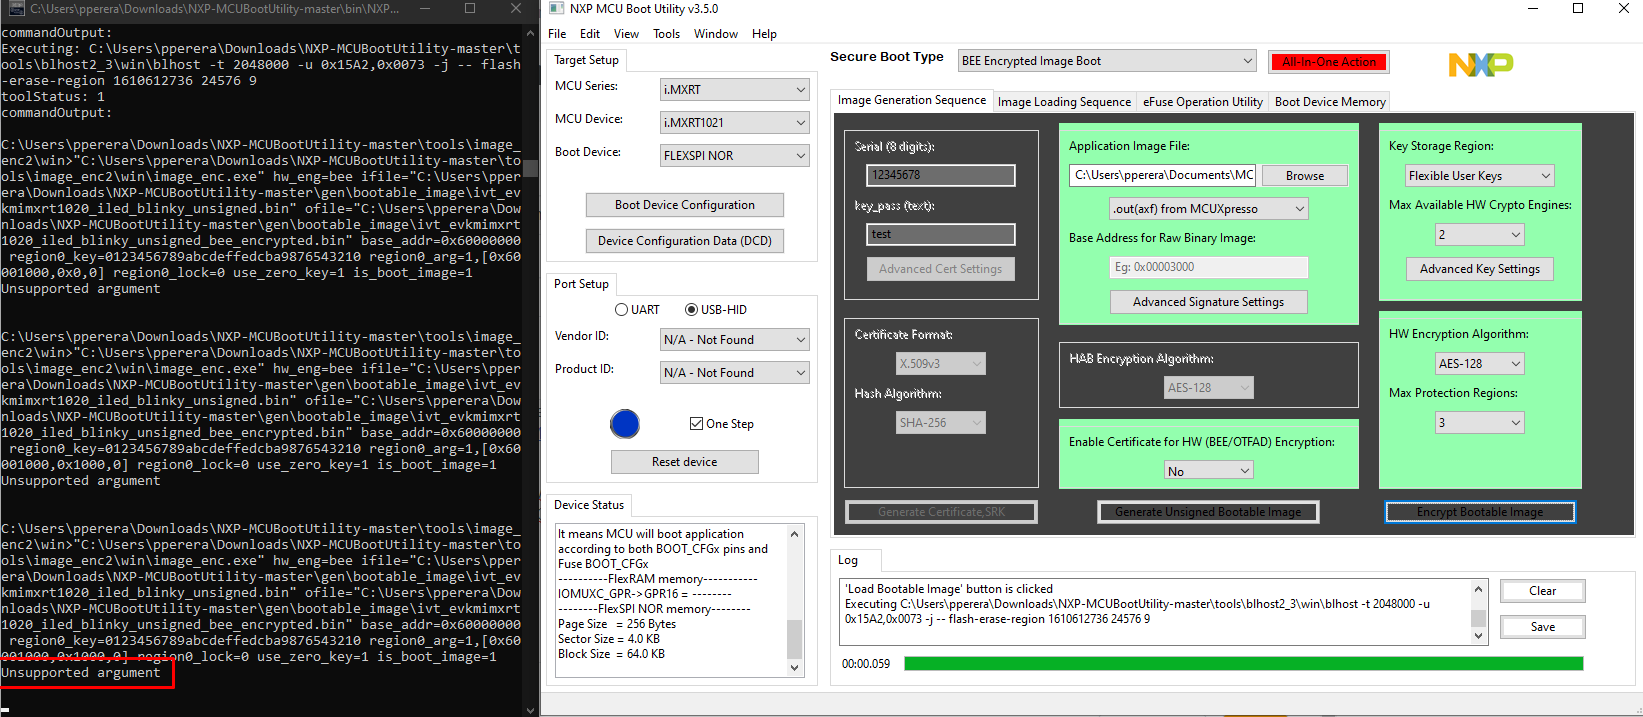
I guess the versions of MCUBootUtility and the image_enc.exe are not compatible. When I try to generate an encrypted file from the MCUBootUtility, I see an error saying "Unsupported argument" in the terminal. (Screenshot attached)
I tried running the image_enc.exe manually. Turned out that the "hw_eng=bee" option provided by the MCUBootUtility is not supported by image_enc.exe. But even when that is removed, I get the following error when I try to encrypt the image, even though the start and length of the region are multiples of 1024 (0x400).
Command:
image_enc.exe
ifile=ivt_evkmimxrt1020_iled_blinky_unsigned.bin
ofile=ivt_evkmimxrt1020_iled_blinky_unsigned_bee_encrypted.bin
base_addr=0x60000000
region0_key=0123456789abcdeffedcba9876543210
region0_arg=1,[0x60001000,0x2000,0]
region0_lock=0
use_zero_key=1
is_boot_image=1
Result:
Invalid FAC region range, both start and length must be 1024-byte aligned.
2. Using MCUXpresso Secure Provisioning Tool (SPT)
- I managed to generate an unsigned bootable image and run successfully.
- Then I generated images with "Boot Type" set to "XIP Encrypted (BEE User Keys) Unsigned". This generated 3 files.
1. evkmimxrt1020_iled_blinky_bootable.bin
2. evkmimxrt1020_iled_blinky_bootable_nopadding.bin
3. evkmimxrt1020_iled_blinky_nopadding.bin
Of these 3 files, only (3) seems to be encrypted. But when I load it to the EVK, it doesn't run.
Pleas let me know if I am doing something wrong/missing any steps.
- 新着としてマーク
- ブックマーク
- 購読
- ミュート
- RSS フィードを購読する
- ハイライト
- 印刷
- 不適切なコンテンツを報告
Hi @navoda ,
Next time, if you have the RT issues, please post the question here:
https://community.nxp.com/t5/i-MX-RT/bd-p/imxrt
Answer your questions:
1. MCUbootUtility tool image_enc.exe download
Yes, it is not the official one, maybe you have limit to access it, so you can use our official tool, SPT tool
2. About SPT tool
Do you already read my post:
The BEE need to burn the fuse, and BOOT_CFG1[0], Encrypted XIP should be enabled:

Otherwise, the BEE boot will be failed.
Best Regards,
Kerry
- 新着としてマーク
- ブックマーク
- 購読
- ミュート
- RSS フィードを購読する
- ハイライト
- 印刷
- 不適切なコンテンツを報告
Hi @kerryzhou ,
Thanks for the quick response. And sorry about posting in the wrong forum.
I did see the forum post you mentioned. Here are the steps followed with the SPT tool. I have attached a zip file with screenshots, bin files and logs.
- Generated a bootable XIP image of the LED blink exmple from MCUXpresso IDE with XIP_BOOT_HEADER_ENABLE=0
- 1 - MCUXpresso Project Properties.png
- Encrypted the image using the Secure Provisioning Tool
- 2 - SPT Build Image Config.png
- 3 - SPT Write Image Config.png
- 4 - SPT-image-write-log.log
- 5 - SPT-generated-evkmimxrt1020_iled_blinky_nopadding.bin
- Set the EncryptedXIP bit to 1
- 6 - Fuse Map.png
- 7 - Fuse Map - Cfg0.png
- When programming the first time, BEE_KEY_SEL0 fuse got burnt to SW-GP2, and the SW-GP2 was burnt with the user key
- 8 - Fuse Map - Cfg1.png
- 9 - OTP Configuration.png
- Programmed the board
- Set the SW8 switches to 1-ON, 2-OFF, 3-ON, 4-OFF and reset the board
- 10 - SW8 state.png
- The LED was not blinking
- Read back the image from 0x60000000 to 0x60006000 for the encrypted image that was not working and for an unencrypted image that was working fine.
- readback-encrypted.dat
- readback-unencrypted.dat
Have I missed something?