
- Forums
- Product Forums
- General Purpose MicrocontrollersGeneral Purpose Microcontrollers
- i.MX Forumsi.MX Forums
- QorIQ Processing PlatformsQorIQ Processing Platforms
- Identification and SecurityIdentification and Security
- Power ManagementPower Management
- Wireless ConnectivityWireless Connectivity
- RFID / NFCRFID / NFC
- Advanced AnalogAdvanced Analog
- Neural Processing UnitsNeural Processing Units
- MCX Microcontrollers
- S32G
- S32K
- S32V
- MPC5xxx
- Other NXP Products
- S12 / MagniV Microcontrollers
- Powertrain and Electrification Analog Drivers
- Sensors
- Vybrid Processors
- Digital Signal Controllers
- 8-bit Microcontrollers
- ColdFire/68K Microcontrollers and Processors
- PowerQUICC Processors
- OSBDM and TBDML
- S32M
- S32Z/E
-
- Solution Forums
- Software Forums
- MCUXpresso Software and ToolsMCUXpresso Software and Tools
- CodeWarriorCodeWarrior
- MQX Software SolutionsMQX Software Solutions
- Model-Based Design Toolbox (MBDT)Model-Based Design Toolbox (MBDT)
- FreeMASTER
- eIQ Machine Learning Software
- Embedded Software and Tools Clinic
- S32 SDK
- S32 Design Studio
- GUI Guider
- Zephyr Project
- Voice Technology
- Application Software Packs
- Secure Provisioning SDK (SPSDK)
- Processor Expert Software
- Generative AI & LLMs
-
- Topics
- Mobile Robotics - Drones and RoversMobile Robotics - Drones and Rovers
- NXP Training ContentNXP Training Content
- University ProgramsUniversity Programs
- Rapid IoT
- NXP Designs
- SafeAssure-Community
- OSS Security & Maintenance
- Using Our Community
-
- Cloud Lab Forums
-
- Knowledge Bases
- ARM Microcontrollers
- i.MX Processors
- Identification and Security
- Model-Based Design Toolbox (MBDT)
- QorIQ Processing Platforms
- S32 Automotive Processing Platform
- Wireless Connectivity
- CodeWarrior
- MCUXpresso Suite of Software and Tools
- MQX Software Solutions
- RFID / NFC
- Advanced Analog
- Neural Processing Units
-
- NXP Tech Blogs
- Home
- :
- Translated Content
- :
- Multi Source Translation Content
- :
- 858294_zh-CN
858294_zh-CN
- Subscribe to RSS Feed
- Mark as New
- Mark as Read
- Bookmark
- Subscribe
- Printer Friendly Page
- Report Inappropriate Content
858294_zh-CN
858294_zh-CN
我正在尝试连接 2 个(0x5A、0x5B)地址。
在代码和数据表中,只需将 addr 引脚连接到(默认为 3.3v)就可以进行通信。
Arduino 可以识别其他传感器,但无法同时读取两个触摸传感器。只是告诉我 i=0 ~ 11
如何让 i=12~23 运行?
如何在代码中区分两个传感器?
mpr121 传感器与 mpr121 传感器之间可以通信吗?
我非常想知道如何在一个 arduino 中连接两个传感器。
我还尝试用 i2c 扫描仪检查线路
奇怪的是,串行监测只告诉我一个传感器。
这是我的代码
我是否应该在第一处添加一些定义以示区别?
或
转换环
为{
}
请尽快告诉我 X(
------------------------------------------------------------------------------------------------------------------------------------
#include"SoftwareSerial.h"
//#define defaultPatch 15 //악기 초기화 버튼 설정 악기호
SoftwareSerial mySerial(2, 3); //SW시리얼핀 정의 D3이 MIDI신호 전송용, D2는 미사용
字节音符 = 0; //MIDI 音符 ()
字节 resetMIDI = 4;//VS1053 重置字节
LED 引脚 = 13; //MIDI 音符 LED LED LED
#include
#include"Adafruit_MPR121.h"
#ifndef _BV
#define _BV(bit) (1<< (bit))
#endif
Adafruit_MPR121 cap = Adafruit_MPR121();
#define MPR121addr 0x5A
#define MPR121addr 0x5B
uint16_t lasttouched = 0;
uint16_t currtouched = 0;
#include
int btn[]={60, 62, 64, 65, 67,69, 71, 72, 74, 76, 77, 79,
81, 83, 84, 86, 88, 89, 91, 93, 95, 96, 98, 100};
字节字节数据;
void setup() {
Serial.begin(9600);
mySerial.begin(9600);
/* while (!Serial) { // 需要防止 leonardo/micro 启动过快!
delay(10);
}
*/
Serial.println("Adafruit MPR121 电容式触摸传感器测试");
// 默认地址为 0x5A,如果绑在 3.3V 上,则为 0x5B
// 如果绑在 SDA 上,则为 0x5C,如果绑在 SCL 上,则为 0x5D
if (!cap.begin(0x5A)) {
Serial.println("MPR121-A未找到,请检查接线?");
while (1);
}
Serial.println("MPR121-Afound!");
//
if (!cap.begin(0x5B)){
Serial.println("MPR121-B未找到,请检查接线?");
while (1);
}
Serial.println("MPR121-B");
//重置 VS1053
pinMode(重置 MIDI,输出);
digitalWrite(重置 MIDI,LOW);
延迟(100);dig
italWrite(重置 MIDI,HIGH);延
迟(100);
}
void loop () {currtouched = cap.touched ();
for (uint8_t i=0; i<12; i++) {
// it if *is* touched and *wasnt* touched before, alert!
if ((currtouched& _BV(i))&& !(lasttouched& _BV(i)) ){
Serial.print(i);Serial.println("touched");
// tone(0, btn[i],100);
noteOn(0, btn[i],100);
//tone(buzzerPin, frequency[i], 330);
}
}
for (uint8_t i=12; i<24; i++) {
// 如果*被*触及且*之前未*触及,则发出警报!
if ((currtouched& _BV(i))&& !(lasttouched& _BV(i)) ){
Serial.print(i); Serial.println(" touched");
// tone(0, btn[i],100);
noteOn(0, btn[i],100);
//tone(buzzerPin, frequency[i], 330);
}
}
//*************** MIDI LOOPBACK ******************//
if(Serial.available()> 0)
{
byteData = Serial.read();
mySerial.write(byteData);
}
lasttouched = currtouched;
返回;
}
//发送 MIDI 音符开启信息。就像按下钢琴键一样
//通道范围从 0-15
void noteOn(字节通道、字节音符、字节攻击力度){t
alkMIDI ((0x90 | 通道)、音符、attack_velocity);}
//发送 MIDI 音符关闭信息。比如释放钢琴键
void noteOff(字节通道、字节音符、字节释放_速度){t
alkMIDI ((0x80 | 通道)、音符、release_velocity);}
//播放一个 MIDI 音符。不检查 cmd 是否大于 127,或者数据值是否小于 127
void talkMIDI(字节 cmd,字节数据 1,字节数据 2){d
igitalWrite(ledPin,HIGH);mySerial.Write (cmd)
);
mySerial.write(data1);
//有些命令只有一个数据字节。所有小于 0xBN 的命令都有 2 个数据字节
//(有点像:http://253.ccarh.org/handout/midiprotocol/)
if( (cmd& 0xF0)<= 0xB0)
mySerial.write(data2));
digitalWrite(ledPin, LOW);
}
我只有一个 MPR121,所以无法尝试代码,但我认为应该像下面这样更改:
for (uint8_t i=0; i<12; i++) {
// it if *is* touched and *wasnt* touched before, alert!
if ((currtouched& _BV(i))&& !(lasttouched& _BV(i)) ){
Serial.print(i);Serial.println("touched");
// tone(0, btn[i],100);
noteOn(0, btn[i],100);
//tone(buzzerPin, frequency[i], 330);
}
}
for (uint8_t i=0; i<12; i++) {
// it if *is* touched and *wasnt* touched before, alert!
if ((currtouched2 & _BV(i))&& !(lasttouched2& _BV(i)) ){
//when sensor is touched do something
Serial.print(i+12);Serial.println("touched");
noteOn(0, btn[i],100);
}
}
MPR121 有 12 个输入端,"_BV(bit) "位参数应始终介于 0-12 之间,然后使用currtouched2选择不同的 ADDR。
Lib's line-230:https://github.com/adafruit/Adafruit_MPR121/blob/master/Adafruit_MPR121.cpp
我已经将两个 MPR121 板连接到我的 Arduino Uno,地址为 0x5C 和 0x5A。板可以正确识别。但是,我想了解如何将两块板设置为自动配置模式,以及如何调整两块板上每个传感器的触摸和版本阈值。目前我使用.CPP 文件进行这些设置,但它似乎只能在 0x5a 地址板上使用。谢谢!
嗨,金、
很高兴听到你设法将所有四个 MPR121 传感器连接在同一 I2C 总线上。
我不太清楚您当前的问题,但我想您可以根据当前与之通信的传感器地址,在 sw 中轻松完成。
顺祝商祺!
托马斯
瓦切尔卡先生
非常感谢
联系的可能性让我松了一口气。
感谢您的热情回复,我成功连接了所有 4 个 mpr121 传感器!.....!
我面临的最后一个问题是,"将触摸按钮的数量扩展到 24 个。"
每个触摸传感器都会给出 0 到 11 的数值。
我怎样才能做到 0-11、12-23、24-35、36-47?
-----------------------------------------------------------------------------------------------------------------------------------------------------
#include"SoftwareSerial.h"
//#define defaultPatch 15 //악기 초기화 버튼 설 정 악기호
SoftwareSerial mySerial(2, 3); //SW시리얼핀 정의 D3이 MIDI신호 전송용, D2는 미사용
字节音符 = 0; //MIDI 音符 ()
字节 resetMIDI = 4;//VS1053 重置字节
LED 引脚 = 13; //MIDI 音符 LED LED LED
#include
#include"Adafruit_MPR121.h"
#ifndef _BV
#define _BV(bit) (1<< (bit))
#endif
//一条 i2c 总线上最多可以有 4 个,但一根足够测试!
adafruit_mpr121 上限 = adafruit_mpr121 ();adafruit_mpr121 cap2 = adafruit_mpr121 ();adafruit_mpr121 cap3 = adafruit_mpr121 ();
adafruit_mpr121 cap4 = Adafruit_mpr121 ();
//记录上次触摸的引脚/
/这样我们就知道按钮何时 “版本”
uint16_t lasttouched = 0; uint16_t currtouched = 0; uint16_t currtouched = 0;
uint16_t lasttouched2 = 0;
uint16_t currtouched2 = 0;
uint16_t lasttouched3 = 0;
uint16_t currtouched3 = 0;
uint16_t lasttouched4 = 0;
uint16_t currtouched4 = 0;
int btn[]={21, 23, 24, 26, 28, 29, 31, 33, 35, 36, 38, 40,
41, 43, 45, 47, 48, 50, 52, 53, 55, 57, 59, 60,
62, 64, 65, 67,69, 71, 72, 74, 76, 77, 79, 81,
83, 84, 86, 88, 89, 91, 93, 95, 96, 98, 100, 101};
字节字节数据;
void setup() {
Serial.begin(9600);
mySerial.begin(9600);
while (!Serial) { // 需要防止 leonardo/micro 启动过快!
delay(10);
}
Serial.println("Adafruit MPR121 电容式触摸传感器测试");
// 默认地址为 0x5A,如果绑在 3.3V 上,则为 0x5B
// 如果绑在 SDA 上,则为 0x5C,如果绑在 SCL 上,则为 0x5D
if (!cap.begin(0x5A)) {
Serial.println("MPR121-A未找到,请检查接线?");
while (1);
}
Serial.println("MPR121-Afound!");
//
如果 (!cap2.begin(0x5B)){
Serial.println("MPR121-B未找到,请检查接线?");
while (1);
}
Serial.println("MPR121-Bfound!");
//
如果 (!cap3.begin(0x5C)){
Serial.println("MPR121-C未找到,请检查接线?");
while (1);
}
Serial.println("MPR121-Cfound!");
//
如果 (!cap4.begin(0x5D)){
Serial.println("MPR121-D未找到,请检查接线?");
while (1);
}
Serial.println("MPR121-D找到了!");
//RESET VS1053
pinMode(RESET MIDI,输出);
digitalWrite(resetMIDI,LOW);
延迟(100);
digitalWrite(resetMIDI,HIGH);
延迟(100);
//这是循环内部所以你可以热插板 //如果你不需要热插件你可以把它放到设置中 ()
cap.begin (0x5A);cap2.begin (0x5B)
;
cap3.begin(0x5C);
cap4.begin(0x5D);
}
void loop() {
// 获取当前触摸的焊盘
currtouched = cap.touched();
currtouched2 = cap2.touched();
currtouched3 = cap3.touched();
currtouched4 = cap4.touched();
f@@ or (uint8_t i=0; i < 48; i++) {
//如果 *被*触摸过而且 *以前没有*触摸过,警报!
i f ((currtouched & _BV (i)) & &!(las
t touched & _BV (i))) {Serial.Print (i);Serial.println (" touched "); //音调 (0,btn [i] ,100);/////////////////////////////////////////////////////////////////////////////////////////////////////////////////////////////////////////////////i f ((currtouched2 & _BV (i)) & &!(lasttouched2 & _BV (i))) {//当触摸传感器时做点什么 Serial.print (i);Serial.println (" touched ");n oteOn (0,btn [i] ,100);}/////////////////////////////////////////////////////////////////////////////////////////////////////////////V (i)) && &!(lasttouched3 & _BV (i))) {//当触摸传感器时做点什么 Serial.print (i);Serial.println (" touched ");n oteOn (0,btn [i] ,100);}//////////////////////////////////////////////////////////////////////////////////////////////////////////////(i)) && &!(lasttouched4 & _BV (i))) {
//当触摸传感器时做点什么 Serial.print (i); Serial.println (" 触摸
"); n
oteOn (0, btn [i] ,100);
} }
//RESET我们上次触摸的状态 = currtouched2; lasttouched3 = currtouched3;
lasttouched4 = currtouched4; retur
n;
//***************** MIDI LOOPBACK ********************/// if (Serial.Available
> 0)
{
byteData = Serial.read();
mySerial.write(byteData);
}
}
//发送 MIDI 音符开启信息。就像按下钢琴键一样
//通道范围从 0-15
void noteOn(字节通道、字节音符、字节攻击力度){t
alkMIDI ((0x90 | 通道)、音符、attack_velocity);}
//发送 MIDI 音符关闭信息。比如释放钢琴键
void noteOff(字节通道、字节音符、字节释放_速度){t
alkMIDI ((0x80 | 通道)、音符、release_velocity);}
//播放一个 MIDI 音符。不检查 cmd 是否大于 127,或者数据值是否小于 127
void talkMIDI(字节 cmd,字节数据 1,字节数据 2){d
igitalWrite(ledPin,HIGH);mySerial.Write (cmd)
);
mySerial.write(data1);
//有些命令只有一个数据字节。所有小于 0xBN 的命令都有 2 个数据字节
//(有点像:http://253.ccarh.org/handout/midiprotocol/)
if( (cmd& 0xF0)<= 0xB0)
mySerial.write(data2));
digitalWrite(ledPin, LOW);
}
嗨,金、
是的,可以与同一 I2C 总线上的两个 MPR121 传感器通信,以便将触摸按钮的数量扩展到 24 个。
实际上,根据 ADDR 引脚的连接情况,您可以为 MPR121 分配四个 I2C 地址:
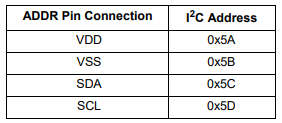
例如,当 ADDR=VDD(写入时转换为 0xB4,读取时转换为 0xB5)时,一个 MPR121 从属服务器的 7 位 I2C 地址为 0x5A,当一个 ADDR=GND 时,另一个从 I2C 地址为 0x5B(写入转换为 0xB6,读取时转换为 0xB7)。
希望对你有所帮助!
顺祝商祺!
托马斯