- Forums
- Product Forums
- General Purpose MicrocontrollersGeneral Purpose Microcontrollers
- i.MX Forumsi.MX Forums
- QorIQ Processing PlatformsQorIQ Processing Platforms
- Identification and SecurityIdentification and Security
- Power ManagementPower Management
- Wireless ConnectivityWireless Connectivity
- RFID / NFCRFID / NFC
- Advanced AnalogAdvanced Analog
- MCX Microcontrollers
- S32G
- S32K
- S32V
- MPC5xxx
- Other NXP Products
- S12 / MagniV Microcontrollers
- Powertrain and Electrification Analog Drivers
- Sensors
- Vybrid Processors
- Digital Signal Controllers
- 8-bit Microcontrollers
- ColdFire/68K Microcontrollers and Processors
- PowerQUICC Processors
- OSBDM and TBDML
- S32M
- S32Z/E
-
- Solution Forums
- Software Forums
- MCUXpresso Software and ToolsMCUXpresso Software and Tools
- CodeWarriorCodeWarrior
- MQX Software SolutionsMQX Software Solutions
- Model-Based Design Toolbox (MBDT)Model-Based Design Toolbox (MBDT)
- FreeMASTER
- eIQ Machine Learning Software
- Embedded Software and Tools Clinic
- S32 SDK
- S32 Design Studio
- GUI Guider
- Zephyr Project
- Voice Technology
- Application Software Packs
- Secure Provisioning SDK (SPSDK)
- Processor Expert Software
- Generative AI & LLMs
-
- Topics
- Mobile Robotics - Drones and RoversMobile Robotics - Drones and Rovers
- NXP Training ContentNXP Training Content
- University ProgramsUniversity Programs
- Rapid IoT
- NXP Designs
- SafeAssure-Community
- OSS Security & Maintenance
- Using Our Community
-
- Cloud Lab Forums
-
- Knowledge Bases
- ARM Microcontrollers
- i.MX Processors
- Identification and Security
- Model-Based Design Toolbox (MBDT)
- QorIQ Processing Platforms
- S32 Automotive Processing Platform
- Wireless Connectivity
- CodeWarrior
- MCUXpresso Suite of Software and Tools
- MQX Software Solutions
- RFID / NFC
- Advanced Analog
-
- NXP Tech Blogs
- Home
- :
- Wireless Connectivity
- :
- Wireless Connectivity Knowledge Base
- :
- KW38 - Reprogramming a KW38 device using the OTAP Client Software
KW38 - Reprogramming a KW38 device using the OTAP Client Software
- Subscribe to RSS Feed
- Mark as New
- Mark as Read
- Bookmark
- Subscribe
- Printer Friendly Page
- Report Inappropriate Content
KW38 - Reprogramming a KW38 device using the OTAP Client Software
KW38 - Reprogramming a KW38 device using the OTAP Client Software
Introduction
Over The Air Programming (OTAP) is a Bluetooth LE custom NXP's service that provides a solution to upgrade the software running in the microcontroller. This document guides to load a new software image in a KW38 device through (Over The Air Programming) OTAP Bluetooth LE service.
Software Requirements
- MCUXpresso IDE or IAR Embedded Workbench IDE.
- FRDM-KW38 SDK.
- IoT Toolbox App, available for Android and iOS. You can also download the APK of the IoT Toolbox App from this post: IoT Toolbox for Android
Hardware Requirements
- FRDM-KW38 board.
- A smartphone with IoT Toolbox App.
KW38 Flash Memory Used by the OTAP Client Software During the Update Process
By default, the 512KB KW38 flash memory is partitioned into:- One 256KB Program Flash array (P-Flash) divided into 2KB sectors with a flash address range from 0x0000_0000 to 0x0003_FFFF.
- One 256KB FlexNVM array divided into 2KB sectors with address range from 0x1000_0000 to 0x1003_FFFF.
- Alias memory with address range from 0x0004_0000 to 0x0007_FFFF. Writes or reads at the Alias memory modifies or returns the FlexNVM content, respectively. In other words, Alias memory is another way to refer to FlexNVM memory using different addresses.


Configuring and Programming OTAP Client Software in IAR Embedded Workbench IDE
As mentioned in the last section, to complete the software for OTAP implementation, there are required two software programmed in your FRDM-KW38, OTAP bootloader and OTAP client. This section guides you to program and configure the settings to choose between external or internal storage using the IAR Embedded Workbench IDE.
1- The first step is to program the OTAP bootloader in your KW38. Unzip your SDK and then locate the OTAP bootloader software in the following path:
<KW38_SDK>\boards\frdmkw38\wireless_examples\framework\bootloader_otap\bm\iar\bootloader_otap.eww
2- Program the OTAP bootloader project on your board by clicking on the "Download and Debug" icon (Ctrl + D) 

3- At this point, you have programmed the OTAP bootloader in your KW38. The next is to program and configure the OTAP client software. Locate the OTAP client software at the following path:
Freertos project version:
<KW38_SDK>\boards\frdmkw38\wireless_examples\bluetooth\otac_att\freertos\iar\otap_client_att_freertos.eww
Baremetal project version:
<KW38_SDK>\boards\frdmkw38\wireless_examples\bluetooth\otac_att\bm\iar\otap_client_att_bm.eww
4- Then, configure the OTAP client to select external or internal storage.
To select the external storage, follow the next steps (this is the default configuration in the SDK project):
4.1- Locate the "app_preinclude.h" header file in the source folder of your workspace. Search the "gEepromType_d" define and set its value to "gEepromDevice_AT45DB041E_c".
/* Specifies the type of EEPROM available on the target board */
#define gEepromType_d           gEepromDevice_AT45DB041E_c
4.2- Open the project options window (Alt + F7). Go to Linker->Config window and set "gUseInternalStorageLink_d=0".

To select the internal storage, follow the next steps:
4.1- Locate the "app_preinclude.h" header file in the source folder of your workspace. Search the "gEepromType_d" define and set its value to "gEepromDevice_InternalFlash_c".
/* Specifies the type of EEPROM available on the target board */
#define gEepromType_d           gEepromDevice_InternalFlash_c
4.2- Open the project options window (Alt + F7). Go to Linker->Config window and set "gUseInternalStorageLink_d=1".

5- Once you have configured the storage settings, save the changes in the project. Then program the software on your board by clicking on the "Download and Debug" icon (Ctrl + D) 

Creating an SREC Image to Update the Software in OTAP Client in IAR Embedded Workbench IDE
This section shows how to create an image compatible with OTAP to reprogram the KW38 OTAP Client using as a starting point, our wireless examples with IAR Embedded Workbench IDE.
1- Select any example from your SDK package in the Bluetooth folder and open it using the IAR IDE. Bluetooth examples are located in the following path:
<KW38_SDK>\boards\frdmkw38\wireless_examples\bluetooth
In this example, we will use the glucose sensor project:
<KW38_SDK>\boards\frdmkw38\wireless_examples\bluetooth\glucose_s\freertos\iar\glucose_sensor_freertos.eww
2- Open the project options window in IAR (Alt + F7). In Linker->Config window, edit the options to include the "gUseBootloaderLink_d=1" flag and update the "gEraseNVMLink_d=0" flag. When the gUseBootlaoderLink_d flag is true, it indicates to the linker file that the image must be addressed after the first flash sector, to do not overwrite the OTAP Bootloader software (as we stated previously). On the other hand, the gEraseNVMLink_d symbol is used to fill with a 0xFF pattern the unused NVM flash memory region. Disabling this flag, our software image will not contain this pattern, in consequence, the image reduces its total size and it improves the speed of the OTAP download and memory usage.
3- Go to "Output Converter" window. Deselect the "Override default" checkbox, then expand the "Output format" combo box and select "Motorola S-records" format. Click the "OK" button to finish.
4- Build the project.
5- Locate the S-Record file (.srec) in the following path, and save it to a known location on your smartphone.
<KW38_SDK>\boards\frdmkw38\wireless_examples\bluetooth\glucose_s\freertos\iar\debug\glucose_sensor_freertos.srec
Configuring and Programming OTAP Client Software in MCUXpresso IDE
As mentioned in a previous section, to complete the software for OTAP implementation, there are required two software programmed in your FRDM-KW38, OTAP bootloader and OTAP client. This section guides you to program and configure the settings to choose between external or internal storage using the MCUXpresso IDE.
1- Open MCUXpresso IDE. Click on "Import SDK example(s)" in the "Quickstart Panel".
2- Select the FRDM-KW38 icon and click "Next >".
3- Import the OTAP bootloader project. It is located in "wireless_examples -> framework -> bootloader_otap -> bm -> bootloader_otap". Click on the "Finish" button.
4- Program the OTAP bootloader project on your board by clicking on the "Debug" icon 

5- Repeat steps 1 to 3 to import the OTAP client software on MCUXpresso IDE. It is located at "wireless_examples -> bluetooth -> otac_att -> freertos -> otap_client_att_freertos" for freertos version, or "wireless_examples -> bluetooth -> otac_att -> bm -> otap_client_bm_freertos" if you prefer baremetal instead.
6- Then, configure the OTAP client to select external or internal storage.
To select the external storage, follow the next steps (this is the default configuration in the SDK project):
6.1- Locate the "app_preinclude.h" file under the source folder in your workspace. Search the "gEepromType_d" define and set its value to "gEepromDevice_AT45DB041E_c".
/* Specifies the type of EEPROM available on the target board */
#define gEepromType_d           gEepromDevice_AT45DB041E_c
6.2- Navigate to "Project -> Properties -> C/C++ Build -> MCU settings -> Memory details". Edit the Flash fields as shown in the figure below, and leave intact the RAM.
To select the internal storage, follow the next steps:
6.1- Locate the "app_preinclude.h" file under the source folder in your workspace. Search the "gEepromType_d" define and set its value to "gEepromDevice_InternalFlash_c".
/* Specifies the type of EEPROM available on the target board */
#define gEepromType_d           gEepromDevice_InternalFlash_c
6.2- Navigate to "Project -> Properties -> C/C++ Build -> MCU settings -> Memory details". Edit the Flash fields as shown in the figure below, and leave intact the RAM.
7- Once you have configured the storage settings, save the changes in the project. Then program the software on your board by clicking on the "Debug" icon 

Creating an SREC Image to Update the Software in OTAP Client in MCUXpresso IDE
This section shows how to create an image compatible with OTAP to reprogram the KW38 OTAP Client using as a starting point, our wireless examples with MCUXpresso IDE.
1- Import any example from your SDK package in the Bluetooth folder as explained previously. Bluetooth examples are located in "wireless_examples -> bluetooth" folder in the SDK Import Wizard. This example will make use of the glucose sensor project in "wireless_examples -> bluetooth -> glucose_s -> freertos -> glucose_sensor_freertos". See the picture below.
2- Navigate to "Project -> Properties -> C/C++ Build -> MCU settings -> Memory details". Edit the Flash fields as shown in the figure below, and leave intact the RAM. The last fields indicate to the linker file that the image must be addressed after the first flash sector, to do not overwrite the OTAP bootloader software, as we stated in the introduction of this post.
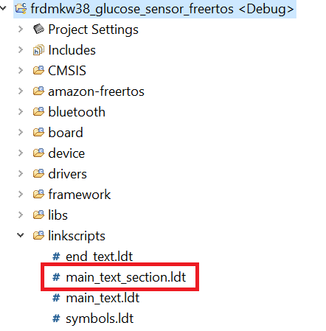
3- Unzip your KW38 SDK package. Drag and drop the "main_text_section.ldt" linker script from the following path to the "linkscripts" folder on your workspace. The result must be similar as shown in the following figure.
<KW38_SDK>\middleware\wireless\framework\Common\devices\MKW38A4\mcux\linkscript_bootloader\main_text_section.ldt
4- Open the "end_text.ldt" linker script file located in the linkscripts folder in MCUXpresso IDE. Locate the section shown in the following figure and remove "FILL" and "BYTE" statements. BYTE and FILL lines are used to fill with a 0xFF pattern the unused NVM flash memory region. Removing this code, our software image will not contain this pattern, in consequence, the image reduces its total size and it improves the speed of the OTAP download and memory usage.
5- Open the "app_preinclude.h" file, and define "gEepromType_d" as internal storage. This is a dummy definition needed to place the bootloader flags in the proper address, so this will not affect the storage method chosen before when you programmed the OTAP client and the OTAP bootloader software in your MCU.
/* Specifies the type of EEPROM available on the target board */
#define gEepromType_d           gEepromDevice_InternalFlash_c
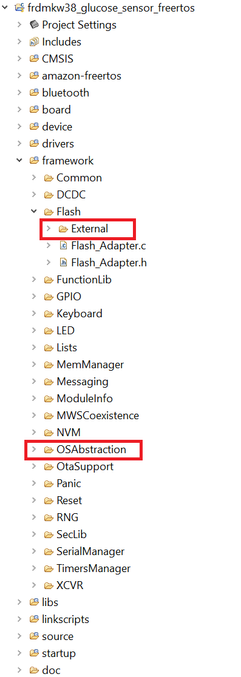
6- Include in your project, the "OtaSupport" folder and its files in the "framework" folder of your project. Include as well the "External" folder and its files in the "framework -> Flash" folder of your project. "OtaSupport" and "External" folders can be found in your SDK. You can easily drag those folders from your SDK download path and drop it into your workspace in MCUXpresso to include them. "OtaSupport" and "External" folders are located at:
OtaSupport
<KW38_SDK>middleware\wireless\framework\OtaSupport
External
<KW38_SDK>middleware\wireless\framework\Flash\External
The result must look like the following picture:
7- Go to "Project -> Properties -> C/C++ Build -> Settings -> Tool Settings -> MCU C Compiler -> Includes". Click on the icon next to "Include paths" (See the picture below). A new window will be displayed, then click on the "Workspace" button.
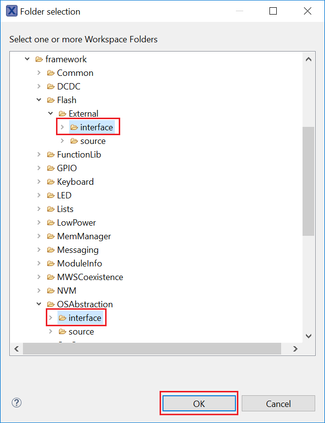
8- Deploy the directory of the project in the "Folder selection" window, and select "framework -> Flash -> External -> interface" and "framework -> OtaSupport -> interface" folders. Click the "OK" button to save the changes.
9- Ensure that "OtaSupport" and "External" folders were imported in the "Include paths" window. Then save the changes by clicking on the "Apply and Close" button.
10- Save and build the project by clicking this icon 
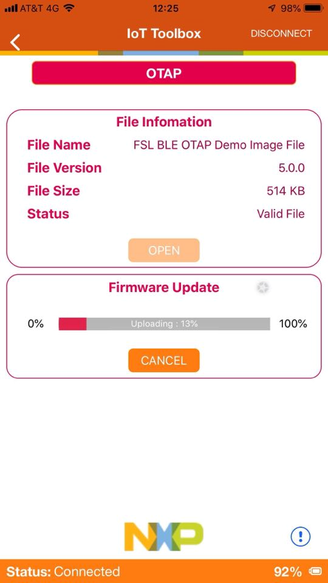
Testing the OTAP Client with IoT Toolbox App
This section explains how to test the OTAP client software using the IoT Toolbox App.
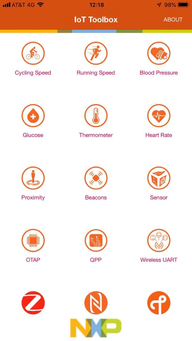
1- Open the IoT Toolbox App on your smartphone. Select OTAP and click "SCAN" to start scanning for a suitable OTAP Client device.
2- Press the ADV button (SW2) on your FRDM-KW38 board to start advertising.
3- Once your smartphone has found the FRDM-KW38 board, it will be identified as "NXP_OTAA". Connect your smartphone with this device. Then a new window will be displayed on your smartphone.
4- Click the "Open" button and search for the SREC software update.
5- Click "Upload" to start the transfer. Wait while the download is completed. A confirmation message will be displayed after a successful update.
6- Wait a few seconds until the software update was programmed on your MCU. The new code will start automatically.
Please let me know any questions about this topic.
- Mark as Read
- Mark as New
- Bookmark
- Permalink
- Report Inappropriate Content
hi,EdgarLomeli
many people can‘t use Google store,can you provide the newest apk for the iot toolbox.
thanks very much.
- Mark as Read
- Mark as New
- Bookmark
- Permalink
- Report Inappropriate Content
Hello @EverettRao,
Thank you for your comments, I have updated this post with the link to download the APK for IoT Toolbox.
Best regards.
Edgar.


