
- Forums
- Product Forums
- General Purpose MicrocontrollersGeneral Purpose Microcontrollers
- i.MX Forumsi.MX Forums
- QorIQ Processing PlatformsQorIQ Processing Platforms
- Identification and SecurityIdentification and Security
- Power ManagementPower Management
- Wireless ConnectivityWireless Connectivity
- RFID / NFCRFID / NFC
- Advanced AnalogAdvanced Analog
- Neural Processing UnitsNeural Processing Units
- MCX Microcontrollers
- S32G
- S32K
- S32V
- MPC5xxx
- Other NXP Products
- S12 / MagniV Microcontrollers
- Powertrain and Electrification Analog Drivers
- Sensors
- Vybrid Processors
- Digital Signal Controllers
- 8-bit Microcontrollers
- ColdFire/68K Microcontrollers and Processors
- PowerQUICC Processors
- OSBDM and TBDML
- S32M
- S32Z/E
-
- Solution Forums
- Software Forums
- MCUXpresso Software and ToolsMCUXpresso Software and Tools
- CodeWarriorCodeWarrior
- MQX Software SolutionsMQX Software Solutions
- Model-Based Design Toolbox (MBDT)Model-Based Design Toolbox (MBDT)
- FreeMASTER
- eIQ Machine Learning Software
- Embedded Software and Tools Clinic
- S32 SDK
- S32 Design Studio
- GUI Guider
- Zephyr Project
- Voice Technology
- Application Software Packs
- Secure Provisioning SDK (SPSDK)
- Processor Expert Software
- Generative AI & LLMs
-
- Topics
- Mobile Robotics - Drones and RoversMobile Robotics - Drones and Rovers
- NXP Training ContentNXP Training Content
- University ProgramsUniversity Programs
- Rapid IoT
- NXP Designs
- SafeAssure-Community
- OSS Security & Maintenance
- Using Our Community
-
- Cloud Lab Forums
-
- Knowledge Bases
- ARM Microcontrollers
- i.MX Processors
- Identification and Security
- Model-Based Design Toolbox (MBDT)
- QorIQ Processing Platforms
- S32 Automotive Processing Platform
- Wireless Connectivity
- CodeWarrior
- MCUXpresso Suite of Software and Tools
- MQX Software Solutions
- RFID / NFC
- Advanced Analog
- Neural Processing Units
-
- NXP Tech Blogs
- Home
- :
- QorIQ Processing Platforms
- :
- T-Series
- :
- SD Deployment T2080RDB
SD Deployment T2080RDB
- Subscribe to RSS Feed
- Mark Topic as New
- Mark Topic as Read
- Float this Topic for Current User
- Bookmark
- Subscribe
- Mute
- Printer Friendly Page
SD Deployment T2080RDB
- Mark as New
- Bookmark
- Subscribe
- Mute
- Subscribe to RSS Feed
- Permalink
- Report Inappropriate Content
Hi everyone,
I am trying to prepare an SD card to load my operating system and work with my T2080RDB-PC.
I am following the instructions detailed in the manual of the SDK 'QORIQ-SDK-2.0-IC-REV0.pdf' in particular I am following the section '4.4.18.9.4 SD Deployment'. I have several doubts about this. Attached is a screenshot of this documentation and a screenshot of the directory QorIQ-SDK-V2.0-20160527-yocto/build_t2080rdb-64b/temp/deploy/images/t2080rdb-64b
Questions:
1) Why do I need the QorIQ-SDK- <Version> -PPCE6500- <release date> -yocto.iso image? I want to record the operating system image that I modified and subsequently built using this SDK. When I built the images I got the image fsl-image-full-t2080rdb-64b-<date>.rootfs.tar.gz ¿Can I use this image?
2) How can I load the image I have built and prepare the SD for it?
3) I do not understand the steps that I attach below:
6. Copy the file system to harddisk by extracing the
QorIQ_SDK_<Version>_E6500_<release date>_ROOTFS_Image.tar.gz.
Remove the tarball after extracting rootfs.
# cp QorIQ_SDK_<Version>_E6500_<release date>_ROOTFS_Image.tar.gz
# sudo tar -zxvf QorIQ_SDK_<Version>_E6500_<release date>_ROOTFS_Image.tar.gz
# rm QorIQ_SDK_<Version>_E6500_<release date>_ROOTFS_Image.tar.gz
Where do I copy the QorIQ_SDK_<Version>_E6500_<release date>_ROOTFS_Image.tar.gz? In what directory? On the SD or on the host PC?
4) Are all the directories that are created in the instructions created in the SD? In the instructions it says 'Create temp directory in host PC' but I think that this should be created in the SD, is it true?
I appreciate the help
- Mark as New
- Bookmark
- Subscribe
- Mute
- Subscribe to RSS Feed
- Permalink
- Report Inappropriate Content
I have solved the problems. I follow the next steps:
We can place the filesystem and kernel on the SD card, then the kernel can boot up automatically after the board is powered on or after reset. Prior to his deployment, make sure U-boot parameters have been set up:
# setenv bootfile uImage.bin
# setenv fdtfile uImage.dtb
# serene bootcmd 'setenv bootargs root=/dev/mmcblk0p2 rw rootdelay=5 console=$consoledev,$baudrate;mmcinfo;ext2load mmc 0:2 $loadaddr /boot/$bootfile;ext2load mmc 0:2 $fdtaddr /boot/$fdtfile;bootm $loadaddr - $fdtaddr'
# save
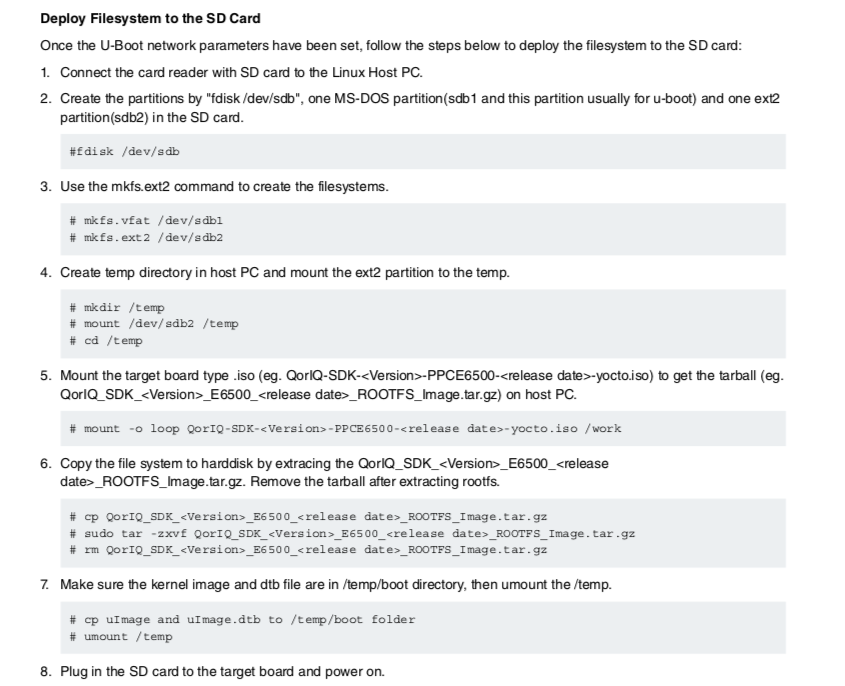
Deploy Filesystem to the SD Card
Once the U-boot network parameters have been set, follow the steps below to deploy the filesystem to he SD card:
Connect the card reader with SD Card to the Linux Host PC.
Create the partitions by ‘fdisk /dev/sdb’, one MS-DOS partition (sdd1 and this partition usually for u-boot) and one ext2 partition (sdd2) in the SD card.
$sudo fdisk /dev/sdd
Command (m por help): p
Command (m for help): d
Command (m for help): w
$ sudo disk /dev/sdd
Command (m for help): n
Partition type: p
First sector: <enter>
Last sector: +512M
Command (m for help): t
Hex Code: b
Command (m for help): n
Partition type: p
First sector: <enter>
Last sector: <enter>
Command (m for help): w
Use the mkfs command to create the filesystem.
$ mkfs.vfat /dev/sdd1
$ mkfs.ext2 /dev/sdd2
Create the temp directory in the host PC and mount the ext2 partition to he temp.
$ sudo mkdir /temp
$ sudo mount /dev/sdd2 /temp
$ cd temp
$ ls
Copy the file system to SD. Make sure the kernel image and dtb file are in /temp/boot directory, then umount the /temp. Access to the directory where we have the tar.gz system file. Normally if you have compiled the image the necessary files are in:
$ cd QorIQ-SDK-V2.0-20160527-yocto/build_t2080rdb-64b/tmp/deploy/images/t2080rdb-64b/
$ sudo tar -xzvf image-full.tar.gaz -C /temp
$ sudo cp uImage.bin /temp/boot
$ sudo cp uImage.dtb /temp/boot
$ sudo unmount /temp
Now the kernel can boot up automatically after the board is powered on or after reset.
- Mark as New
- Bookmark
- Subscribe
- Mute
- Subscribe to RSS Feed
- Permalink
- Report Inappropriate Content
If SDK 2.0 is used for building, find kernel image file, .dtb and rott file system using the following path:
QorIQ-SDK-V2.0-20160527-yocto/build_t2080rdb/tmp/deploy/images/t2080rdb
The Section 4.4.18.9.4 contains command sequence is image from the factory is used.
Have a great day,
Pavel Chubakov
-----------------------------------------------------------------------------------------------------------------------
Note: If this post answers your question, please click the Correct Answer button. Thank you!
-----------------------------------------------------------------------------------------------------------------------