- Forums
- Product Forums
- General Purpose MicrocontrollersGeneral Purpose Microcontrollers
- i.MX Forumsi.MX Forums
- QorIQ Processing PlatformsQorIQ Processing Platforms
- Identification and SecurityIdentification and Security
- Power ManagementPower Management
- Wireless ConnectivityWireless Connectivity
- RFID / NFCRFID / NFC
- Advanced AnalogAdvanced Analog
- MCX Microcontrollers
- S32G
- S32K
- S32V
- MPC5xxx
- Other NXP Products
- S12 / MagniV Microcontrollers
- Powertrain and Electrification Analog Drivers
- Sensors
- Vybrid Processors
- Digital Signal Controllers
- 8-bit Microcontrollers
- ColdFire/68K Microcontrollers and Processors
- PowerQUICC Processors
- OSBDM and TBDML
- S32M
- S32Z/E
-
- Solution Forums
- Software Forums
- MCUXpresso Software and ToolsMCUXpresso Software and Tools
- CodeWarriorCodeWarrior
- MQX Software SolutionsMQX Software Solutions
- Model-Based Design Toolbox (MBDT)Model-Based Design Toolbox (MBDT)
- FreeMASTER
- eIQ Machine Learning Software
- Embedded Software and Tools Clinic
- S32 SDK
- S32 Design Studio
- GUI Guider
- Zephyr Project
- Voice Technology
- Application Software Packs
- Secure Provisioning SDK (SPSDK)
- Processor Expert Software
- Generative AI & LLMs
-
- Topics
- Mobile Robotics - Drones and RoversMobile Robotics - Drones and Rovers
- NXP Training ContentNXP Training Content
- University ProgramsUniversity Programs
- Rapid IoT
- NXP Designs
- SafeAssure-Community
- OSS Security & Maintenance
- Using Our Community
-
- Cloud Lab Forums
-
- Knowledge Bases
- ARM Microcontrollers
- i.MX Processors
- Identification and Security
- Model-Based Design Toolbox (MBDT)
- QorIQ Processing Platforms
- S32 Automotive Processing Platform
- Wireless Connectivity
- CodeWarrior
- MCUXpresso Suite of Software and Tools
- MQX Software Solutions
- RFID / NFC
- Advanced Analog
-
- NXP Tech Blogs
- Home
- :
- ARM Microcontrollers
- :
- Kinetis Microcontrollers Knowledge Base
- :
- Load Encrypted Image - MCUBoot Flashloader
Load Encrypted Image - MCUBoot Flashloader
- Subscribe to RSS Feed
- Mark as New
- Mark as Read
- Bookmark
- Subscribe
- Printer Friendly Page
- Report Inappropriate Content
Load Encrypted Image - MCUBoot Flashloader
Load Encrypted Image - MCUBoot Flashloader
The following document explains how to load an encrypted image using the MCUBoot in the K64.
Download the SDK for the K64, be sure that the MCU boot feature is selected:
https://mcuxpresso.nxp.com/en/welcome

For the example, I’m going to use gpio_led_output. To prepare the example to work with the bootloader, you would need to do the following steps:
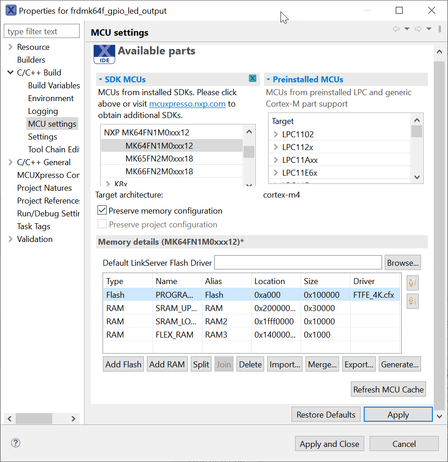
- In properties / C/C++ Build / MCU settings set the start of the flash to the 0xa000, this to preserve the bootloader section:

Generate the binary for the image to load.

- Write BCA
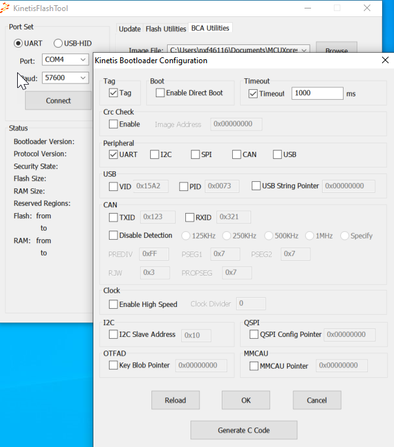
- Create the BCA, this field is to manage the different features of the bootloader. To generated this, the KinetisFlashTool can be used, you can find it in the following link. In this options you need to add the tag, the peripheral used to communicate and a timeout to have a time frame to call again the bootloader without need to call it from your application. Click OK and save the BCA to the image.

The bootloader can be found in the SDK examples:
In the bootloader_config.h, change the BL_FEATURE_ENCRYPTION_KEY_ADDRESS for outside the code you would load, in this case, I'm going to use the 0xF000:
#define BL_FEATURE_ENCRYPTION_KEY_ADDRESS 0xf000 // NOTE: this address must be 4-byte aligned.
After this, load the firmware to the MCU.
For the next steps we will need to generate the secure file:
- Generate the AES 128 key using the elftosb

Command: elftosb.exe -V -d -f kinetis -n 1 – K 128 -o SBKEK.key
- Create the SB image from the binary,
- Use option -k to pass the key generated before
- Use option -f to define the device. Device must be kinetis to be able to use a 128 AES key
- Use option -c to load the bd file. (see attached)
- Use option -o to define the output

Command: elftosb.exe -V -d -f kinetis -c (bd file path) -k (key path) -o (output path).sb2 (image path)
Now we will load the image using the blhost:
- Erase the memory section to load the program and reset the device

Command: blhost.exe -p COMx – flash-erase-region 0xa000 0x10000
- Program AES key, same as generated in the previous step. Load it to the memory section previously defined in the BL_FEATURE_ENCRYPTION_KEY_ADDRESS and confirm that the key was loaded correctly:

Command: blhost.exe -p COMx – write-memory 0xF000 “{{key generated}}”
Command: blhost.exe -p COMx –read-memory 0xF000 16
- Load the SB file

Command: blhost.exe -p COMx – receive-sb-file (path encrypted sb file)
After a reset the application should run correctly.
