
- Forums
- Product Forums
- General Purpose MicrocontrollersGeneral Purpose Microcontrollers
- i.MX Forumsi.MX Forums
- QorIQ Processing PlatformsQorIQ Processing Platforms
- Identification and SecurityIdentification and Security
- Power ManagementPower Management
- Wireless ConnectivityWireless Connectivity
- RFID / NFCRFID / NFC
- Advanced AnalogAdvanced Analog
- Neural Processing UnitsNeural Processing Units
- MCX Microcontrollers
- S32G
- S32K
- S32V
- MPC5xxx
- Other NXP Products
- S12 / MagniV Microcontrollers
- Powertrain and Electrification Analog Drivers
- Sensors
- Vybrid Processors
- Digital Signal Controllers
- 8-bit Microcontrollers
- ColdFire/68K Microcontrollers and Processors
- PowerQUICC Processors
- OSBDM and TBDML
- S32M
- S32Z/E
-
- Solution Forums
- Software Forums
- MCUXpresso Software and ToolsMCUXpresso Software and Tools
- CodeWarriorCodeWarrior
- MQX Software SolutionsMQX Software Solutions
- Model-Based Design Toolbox (MBDT)Model-Based Design Toolbox (MBDT)
- FreeMASTER
- eIQ Machine Learning Software
- Embedded Software and Tools Clinic
- S32 SDK
- S32 Design Studio
- GUI Guider
- Zephyr Project
- Voice Technology
- Application Software Packs
- Secure Provisioning SDK (SPSDK)
- Processor Expert Software
- Generative AI & LLMs
-
- Topics
- Mobile Robotics - Drones and RoversMobile Robotics - Drones and Rovers
- NXP Training ContentNXP Training Content
- University ProgramsUniversity Programs
- Rapid IoT
- NXP Designs
- SafeAssure-Community
- OSS Security & Maintenance
- Using Our Community
-
- Cloud Lab Forums
-
- Knowledge Bases
- ARM Microcontrollers
- i.MX Processors
- Identification and Security
- Model-Based Design Toolbox (MBDT)
- QorIQ Processing Platforms
- S32 Automotive Processing Platform
- Wireless Connectivity
- CodeWarrior
- MCUXpresso Suite of Software and Tools
- MQX Software Solutions
- RFID / NFC
- Advanced Analog
- Neural Processing Units
-
- NXP Tech Blogs
- Home
- :
- 汎用マイクロコントローラ
- :
- Kinetisマイクロコントローラ
- :
- Re: Unable to flash the FRDM-K82f board using MCUXpresso IDE
Unable to flash the FRDM-K82f board using MCUXpresso IDE
- RSS フィードを購読する
- トピックを新着としてマーク
- トピックを既読としてマーク
- このトピックを現在のユーザーにフロートします
- ブックマーク
- 購読
- ミュート
- 印刷用ページ
- 新着としてマーク
- ブックマーク
- 購読
- ミュート
- RSS フィードを購読する
- ハイライト
- 印刷
- 不適切なコンテンツを報告
Hi,
I'm new to the FRDM-K82F board. I'm using the MCUXpresso IDE to flash the binary to this board.
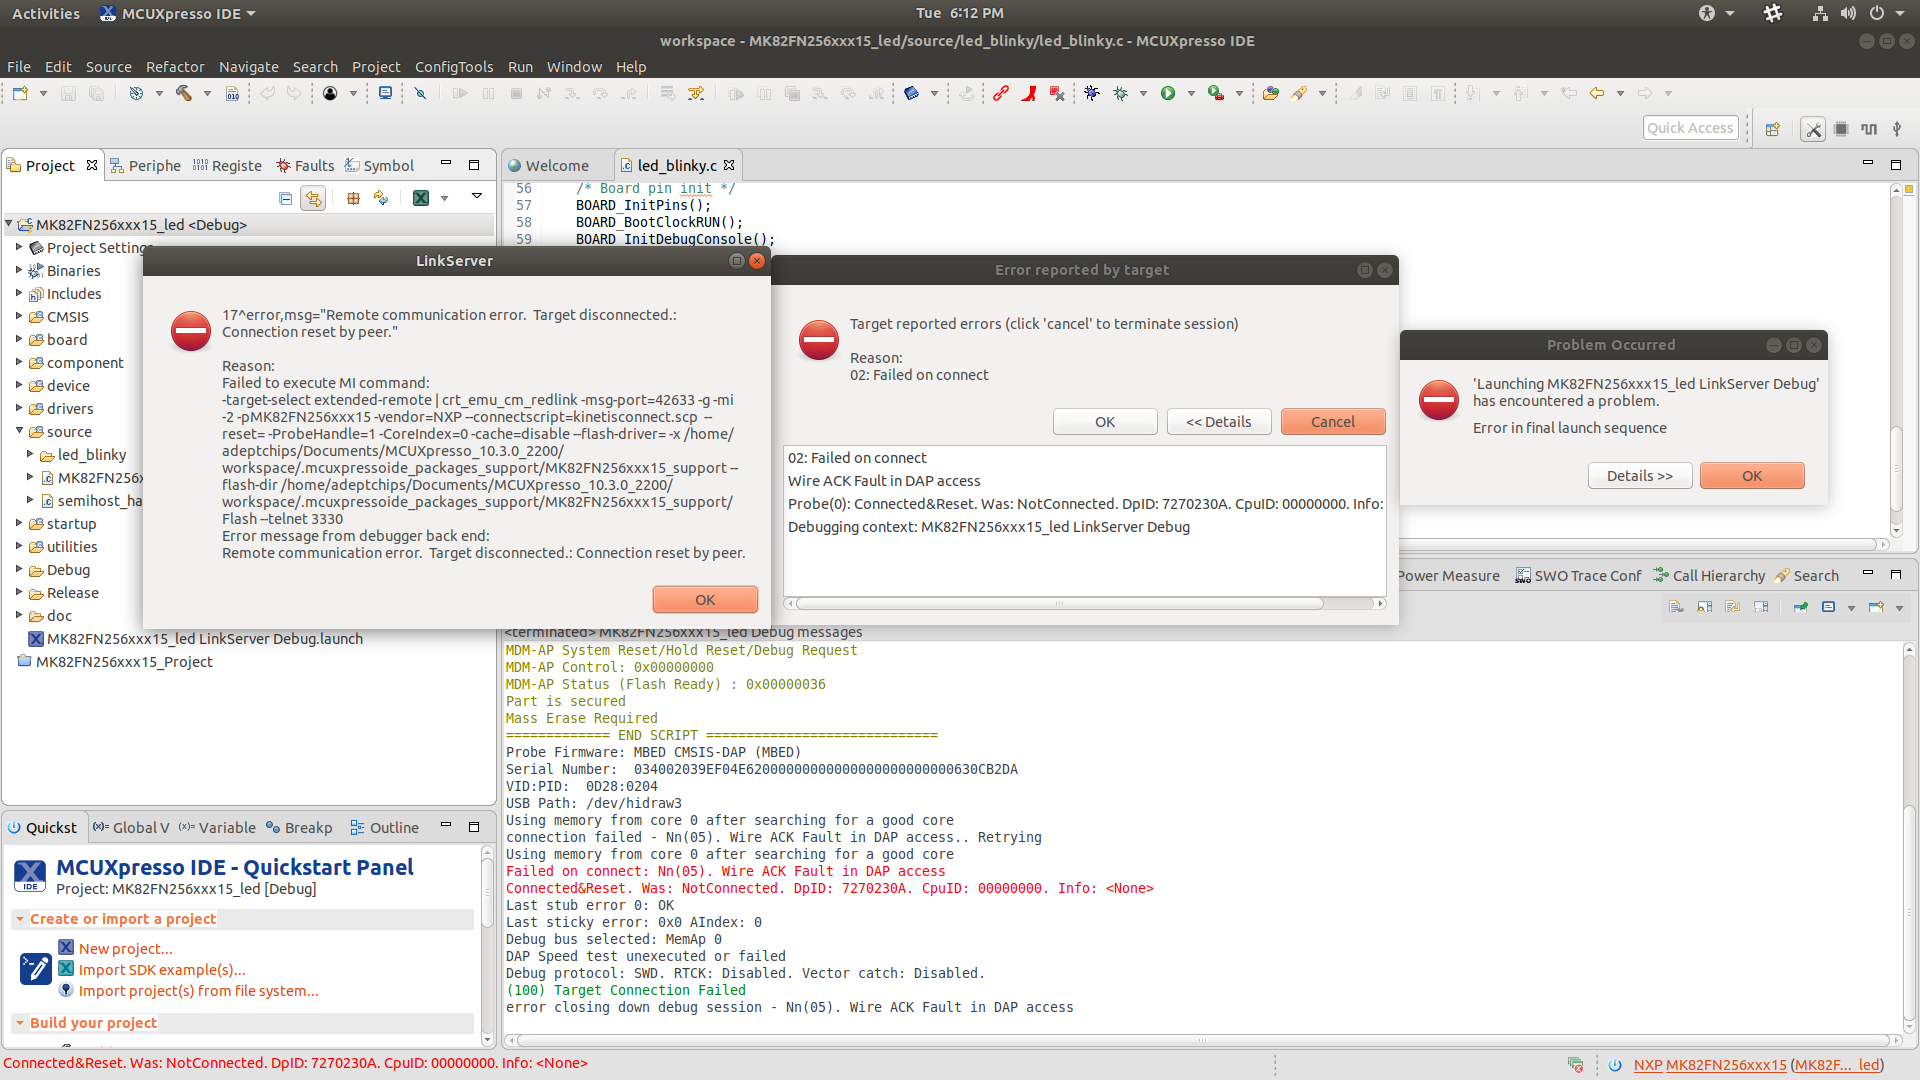
I'm facing the below problem while flashing the binary to the board. Please find the attached image.
2-3 times i tried and i was able to flash with the same error, but now i'm not able to flash at all, stuck with the same error.
connection failed - Nn(05). Wire ACK Fault in DAP access.. Retrying
Using memory from core 0 after searching for a good core
Failed on connect: Nn(05). Wire ACK Fault in DAP access
Connected&Reset. Was: NotConnected. DpID: 7270230A. CpuID: 00000000. Info: <None>
Thanks,
venkatesh.
解決済! 解決策の投稿を見る。
- 新着としてマーク
- ブックマーク
- 購読
- ミュート
- RSS フィードを購読する
- ハイライト
- 印刷
- 不適切なコンテンツを報告
Hi venkatesh,
Please try to change your FRDM-K82 on board debugger to JLINK at first.
Please follow my steps:
1. Download JLINK driver from this link:
SEGGER - The Embedded Experts - Downloads
After you download it, please install it.
2. Download the JLINK firmware from this link:
SEGGER - The Embedded Experts - Downloads
You will get the file named as: 04_OpenSDA_FRDM-K82F.bin
3. Power off your board
Press the SW1, and hold on it, then plug your USB cable to J5, you will find your board is a device named as"BOOTLOADER", then release the SW1 button.
Note, if you even can't find the BOOTLOADER, and you are using the win10, then you must need to change the K20 code with external debugger. If you can find the BOOTLAODER, please go to the next step
4. Send your "04_OpenSDA_FRDM-K82F.bin" to the "BOOTLOADERD".
Wait the sending finished.
5. Power off the board and power on it again, check the device management:

It means you already change the firmware correctly to JLINK, then you can use the JLINK as the debugger.
6. Please open the JLINK commander window


You can find, the above test result from my side, I can find the Cortex-M4, please also check it on your side.
If you can find the core, it will don't have the big problem.
Please test it on your side.
Any updated information, please kindly let me know.
Have a great day,
Kerry
-----------------------------------------------------------------------------------------------------------------------
Note: If this post answers your question, please click the Correct Answer button. Thank you!
-----------------------------------------------------------------------------------------------------------------------
- 新着としてマーク
- ブックマーク
- 購読
- ミュート
- RSS フィードを購読する
- ハイライト
- 印刷
- 不適切なコンテンツを報告
Hi Venkatesh g,
You have the MCUxpresso IDE project, you don't need to flash the binary directly.
At first, please delete the following .launch:

Then build the project again.
Then click the debug button:

and enter debug mode again.
If you still have question about it, please kindly let me know.
Have a great day,
Kerry
-----------------------------------------------------------------------------------------------------------------------
Note: If this post answers your question, please click the Correct Answer button. Thank you!
-----------------------------------------------------------------------------------------------------------------------
- 新着としてマーク
- ブックマーク
- 購読
- ミュート
- RSS フィードを購読する
- ハイライト
- 印刷
- 不適切なコンテンツを報告
I have followed the way which you mentioned, but when i clicked on debug symbol, we need to create the launch file specifically, so i used option as Debug as-> 2. MCUXpressoIDE LinkServer option, then debug launch file is getting created again and same issue is reproducing.
Thanks,
venkatesh
- 新着としてマーク
- ブックマーク
- 購読
- ミュート
- RSS フィードを購読する
- ハイライト
- 印刷
- 不適切なコンテンツを報告
Hi Venkatesh g,
What the PC OS you are using?
Can you try to change your on board debugger firmware to JLINK, then use the JLINK commander to detect the K82 core?
The on board debug firmware can be found from this link:
OpenSDA Serial and Debug Adapter|NXP
If you are using the win10 system, I highly recommend you use the external debugger to check your on board K20 debugger code at first. But if you are using win7 system, it's OK.
Please check the opensda link, and change the debugger firmware to JLINK, then use the JLINK commander tool to check the ARM core.
If you still have problems, please kindly let me know.
Have a great day,
Kerry
-----------------------------------------------------------------------------------------------------------------------
Note: If this post answers your question, please click the Correct Answer button. Thank you!
-----------------------------------------------------------------------------------------------------------------------
- 新着としてマーク
- ブックマーク
- 購読
- ミュート
- RSS フィードを購読する
- ハイライト
- 印刷
- 不適切なコンテンツを報告
Hi Kerry Zhou,
We do not have any external debugger to connect to the board.
Kindly let me know is it possible to flash the OpenSDA firmware using the existed micro usb cable which has come with board while purchasing.
Thanks,
venkatesh
- 新着としてマーク
- ブックマーク
- 購読
- ミュート
- RSS フィードを購読する
- ハイライト
- 印刷
- 不適切なコンテンツを報告
Hi venkatesh,
Please try to change your FRDM-K82 on board debugger to JLINK at first.
Please follow my steps:
1. Download JLINK driver from this link:
SEGGER - The Embedded Experts - Downloads
After you download it, please install it.
2. Download the JLINK firmware from this link:
SEGGER - The Embedded Experts - Downloads
You will get the file named as: 04_OpenSDA_FRDM-K82F.bin
3. Power off your board
Press the SW1, and hold on it, then plug your USB cable to J5, you will find your board is a device named as"BOOTLOADER", then release the SW1 button.
Note, if you even can't find the BOOTLOADER, and you are using the win10, then you must need to change the K20 code with external debugger. If you can find the BOOTLAODER, please go to the next step
4. Send your "04_OpenSDA_FRDM-K82F.bin" to the "BOOTLOADERD".
Wait the sending finished.
5. Power off the board and power on it again, check the device management:
It means you already change the firmware correctly to JLINK, then you can use the JLINK as the debugger.
6. Please open the JLINK commander window
You can find, the above test result from my side, I can find the Cortex-M4, please also check it on your side.
If you can find the core, it will don't have the big problem.
Please test it on your side.
Any updated information, please kindly let me know.
Have a great day,
Kerry
-----------------------------------------------------------------------------------------------------------------------
Note: If this post answers your question, please click the Correct Answer button. Thank you!
-----------------------------------------------------------------------------------------------------------------------
- 新着としてマーク
- ブックマーク
- 購読
- ミュート
- RSS フィードを購読する
- ハイライト
- 印刷
- 不適切なコンテンツを報告
Hi Kerry Zhou,
After trying everything during trials of fixing flashing problems, i'm end up with boot loader lock issue, now i'm unable to connect to the target at all. Please see the image below

what does it mean, does it mean boot loader got locked ? if so how to unlock and flash the program.
Kindly help me out with this issue.
Thanks,
venkatesh
- 新着としてマーク
- ブックマーク
- 購読
- ミュート
- RSS フィードを購読する
- ハイライト
- 印刷
- 不適切なコンテンツを報告
Hi venkatesh,
Do you modify the flash configuration field which located on the flash address 0X40C?
Now, just in your JLINK commander window, please input: unlock kinetis
Try to unlock the chip, whether can you connect your MCU again after you do the unlock commander?
Any updated information, please kindly let me know.
Have a great day,
Kerry
-----------------------------------------------------------------------------------------------------------------------
Note: If this post answers your question, please click the Correct Answer button. Thank you!
-----------------------------------------------------------------------------------------------------------------------
- 新着としてマーク
- ブックマーク
- 購読
- ミュート
- RSS フィードを購読する
- ハイライト
- 印刷
- 不適切なコンテンツを報告
Hi Kerry Zhou,
Specifically I did not change any configuration at any address, I just flashes multiple times .bin file multiple times that's it.
And moreover I'm unable to unlock it, I attached the image in previous Replay kindly check it.
Now the first thing is device is not getting connected so I'm unable to unlock it, getting error message as
"Read out protection is set and madm erase is disabled. J-Link cannot upgrade the device".
I tried flashing openSDA bootloader multiple times but no result.
So what does that issue means exactly, kindly provide solution.
If possible we can connect through Skype that will be really very helpful for me to debug this issue. Please find my Skype ID below.
Thanks,
Venkatesh
- 新着としてマーク
- ブックマーク
- 購読
- ミュート
- RSS フィードを購読する
- ハイライト
- 印刷
- 不適切なコンテンツを報告
Hi Venkatsh g,
Thank you for your updated information.
From your result, unfortunately, you secure the chip, and the mass erase bit is also disabled, it means that your chip is secured to the highest level, normally, this mode can't be unsecured any more.
But, from your attached picture, I find you select the device as "MK82FN256XXX15", not "MK82FN256XXX15 (ALLOW SECURITY)", this method normally won't allow the security. So I think you also can try to select the chip as "MK82FN256XXX15 (ALLOW SECURITY)", then after the connect failed, input: unlock kinetis

Just try it again.
If this method also can't work, from my own viewpoint, one way for you, get a new K82 chip, replace your on board K82 chip to save your board.
Wish it helps you!
Have a great day,
Kerry
-----------------------------------------------------------------------------------------------------------------------
Note: If this post answers your question, please click the Correct Answer button. Thank you!
-----------------------------------------------------------------------------------------------------------------------
- 新着としてマーク
- ブックマーク
- 購読
- ミュート
- RSS フィードを購読する
- ハイライト
- 印刷
- 不適切なコンテンツを報告
Hi Kerry Zhou,
I tried unlocking MK82FN256XXX15 <ALLOW SECURITY> but I am getting Timeout error. I am unable to unlock ALLOW SECURITY module as well.
First of all, I would like to know, how the chips got secured. Since I have not written anything in the firmware, its just led blinking, how chip moved to highly secured mode.
How to avoid this issue.
Thanks,
venkatesh
- 新着としてマーク
- ブックマーク
- 購読
- ミュート
- RSS フィードを購読する
- ハイライト
- 印刷
- 不適切なコンテンツを報告
Hi venkatesh g,
It's a sad result, your chip is dead which is secured to the highest level, no one can unlock it now.
Just as I have told you: get a new K82 chip, replace your on board K82 chip to save your board.
Have a great day,
Kerry
-----------------------------------------------------------------------------------------------------------------------
Note: If this post answers your question, please click the Correct Answer button. Thank you!
-----------------------------------------------------------------------------------------------------------------------
- 新着としてマーク
- ブックマーク
- 購読
- ミュート
- RSS フィードを購読する
- ハイライト
- 印刷
- 不適切なコンテンツを報告
Hi Kerry Zhou,
Thanks for your comments.
Basically, i'm using MCUXpresso IDE on Ubuntu 18.04 machine.
And since I do not have JLink Segger debug hardware, can I use the onchip debugger with the interface of USB cable?
Let me know the possibility to use the on chip debugger rather than external debugger.
Thanks,
venkatesh
- 新着としてマーク
- ブックマーク
- 購読
- ミュート
- RSS フィードを購読する
- ハイライト
- 印刷
- 不適切なコンテンツを報告
Hi Venkatesh g,
Do you try to follow my above steps just change the on board firmware to JLINK, which doesn't need the external debugger.
If you are using Ubuntn, please download the JLINK driver from this link:
SEGGER - The Embedded Experts - Downloads - J-Link / J-Trace
The last reply JLINK driver link is for windows.
Have a great day,
Kerry
-----------------------------------------------------------------------------------------------------------------------
Note: If this post answers your question, please click the Correct Answer button. Thank you!
-----------------------------------------------------------------------------------------------------------------------
- 新着としてマーク
- ブックマーク
- 購読
- ミュート
- RSS フィードを購読する
- ハイライト
- 印刷
- 不適切なコンテンツを報告
Hi Kerry Zhou,
Thank you so much, your suggestions help me a lot to debug this issue.
Anyway it is working in Windows 10 PC, I'm trying to make it work for Ubuntu PC.
After flashing openSDA driver file device is not detecting in /dev entry, it may be because of missing drivers, so I will try to install driver which you suggested in last replay and will let you know if I face any issue
Thanks,
Venkatesh
- 新着としてマーク
- ブックマーク
- 購読
- ミュート
- RSS フィードを購読する
- ハイライト
- 印刷
- 不適切なコンテンツを報告
HI Venkatesh,
Thanks a lot for your updated information.
And that's very good to hear you already make it work for win10.
OK, now, please try your ubuntu PC.
If you still have question about it, please kindly let me know.
Have a great day,
Kerry
-----------------------------------------------------------------------------------------------------------------------
Note: If this post answers your question, please click the Correct Answer button. Thank you!
-----------------------------------------------------------------------------------------------------------------------
- 新着としてマーク
- ブックマーク
- 購読
- ミュート
- RSS フィードを購読する
- ハイライト
- 印刷
- 不適切なコンテンツを報告
Hi Kerry Zhou,
I was unable to make it resolved for Ubuntu PC. Probes are not getting available after installing the Jlink drivers in ubuntu.
And one more thing, while flashing the binary(in windows pc), board is getting flashed but i'm getting an error like
deadbee1: Failed to execute MI command:
-data-disassemble -s 3735928551 -e 3735928583 -- 3
Error message from debugger back end:
Cannot access memory at address 0xdeadbee6
I don't know what is this error says exactly.
And sometimes after flashing the binary, control is hitting the ResetISR function, but it should supposed to point at main() function.
I'm just trying to flash the led_blink example program which I had imported from the SDK.
I have tried different examples as well but getting the same error.
Kindly suggest me know the solution.
see the below picture for error

Thanks,
venkatesh