
- Forums
- Product Forums
- General Purpose MicrocontrollersGeneral Purpose Microcontrollers
- i.MX Forumsi.MX Forums
- QorIQ Processing PlatformsQorIQ Processing Platforms
- Identification and SecurityIdentification and Security
- Power ManagementPower Management
- Wireless ConnectivityWireless Connectivity
- RFID / NFCRFID / NFC
- Advanced AnalogAdvanced Analog
- Neural Processing UnitsNeural Processing Units
- MCX Microcontrollers
- S32G
- S32K
- S32V
- MPC5xxx
- Other NXP Products
- S12 / MagniV Microcontrollers
- Powertrain and Electrification Analog Drivers
- Sensors
- Vybrid Processors
- Digital Signal Controllers
- 8-bit Microcontrollers
- ColdFire/68K Microcontrollers and Processors
- PowerQUICC Processors
- OSBDM and TBDML
- S32M
- S32Z/E
-
- Solution Forums
- Software Forums
- MCUXpresso Software and ToolsMCUXpresso Software and Tools
- CodeWarriorCodeWarrior
- MQX Software SolutionsMQX Software Solutions
- Model-Based Design Toolbox (MBDT)Model-Based Design Toolbox (MBDT)
- FreeMASTER
- eIQ Machine Learning Software
- Embedded Software and Tools Clinic
- S32 SDK
- S32 Design Studio
- GUI Guider
- Zephyr Project
- Voice Technology
- Application Software Packs
- Secure Provisioning SDK (SPSDK)
- Processor Expert Software
- Generative AI & LLMs
-
- Topics
- Mobile Robotics - Drones and RoversMobile Robotics - Drones and Rovers
- NXP Training ContentNXP Training Content
- University ProgramsUniversity Programs
- Rapid IoT
- NXP Designs
- SafeAssure-Community
- OSS Security & Maintenance
- Using Our Community
-
- Cloud Lab Forums
-
- Knowledge Bases
- ARM Microcontrollers
- i.MX Processors
- Identification and Security
- Model-Based Design Toolbox (MBDT)
- QorIQ Processing Platforms
- S32 Automotive Processing Platform
- Wireless Connectivity
- CodeWarrior
- MCUXpresso Suite of Software and Tools
- MQX Software Solutions
- RFID / NFC
- Advanced Analog
- Neural Processing Units
-
- NXP Tech Blogs
- Home
- :
- General Purpose Microcontrollers
- :
- LPC Microcontrollers
- :
- Re: OM13085 User Manual - overdue...
OM13085 User Manual - overdue...
- Subscribe to RSS Feed
- Mark Topic as New
- Mark Topic as Read
- Float this Topic for Current User
- Bookmark
- Subscribe
- Mute
- Printer Friendly Page
OM13085 User Manual - overdue...
- Mark as New
- Bookmark
- Subscribe
- Mute
- Subscribe to RSS Feed
- Permalink
- Report Inappropriate Content
Where is the user manual promised by Embedded Artists for the end of 2018? I just need to know if a user manual will soon be released (and when), so that if not I can choose another product.
This is non-trivial dev board introduced and sold for some time with NO user manual. A handful of brief videos does not substitute for professional documentation. If there were not trouble with connecting the IDE to the debug probe, and if I knew the functions of the jumpers (schematics are insufficient), I might be able to live with it. So, is there a manual in the offing, or not? If there will be no manual, I do NOT want the board.
This is not a rhetorical question: Please reply.
- Mark as New
- Bookmark
- Subscribe
- Mute
- Subscribe to RSS Feed
- Permalink
- Report Inappropriate Content
If it wasn't clear, the LPC11Uxx_Debug_Probe_VCOM_v1.0.0.EXE installer is for Windows 7-8. I think you confirmed earlier you were using Windows 10.The driver install is independent of the probe firmware update. I can't tell if the Explorer instance is the one for updating the probe firmware. Did you hold down RESET when the board powered up?
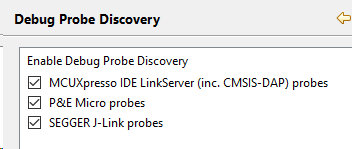
I did notice in one of your attachments, the IDE is looking for SEGGER probes. From the File Menu, navigate to Windows -> Preferences -> MCUXpresso IDE -> Debug Probe Discovery and make certain the MCUXpresso IDE LinkServer (inc. CMSIS-DAP) probes checkbox is enabled.
Next, I'd recommend searching through the HID devices and look for a device with an NXP VID of 1FC9 or 21BD. You can use the Device Manager (slow), or in the Scripts folder is a command script, listusb.cmd, which is useful for this purpose.
MCUXpresso Support
- Mark as New
- Bookmark
- Subscribe
- Mute
- Subscribe to RSS Feed
- Permalink
- Report Inappropriate Content
Hi again,
Indeed the VCOM install business was not clear at all - you gave me
instructions to install it, the downloaded instructions (which I always
read) say don't install it on WIN10, I asked you about that, and I got no
reply. Please let me know what software should and should not be
installed. I sometimes ask multiple questions in one email but not all
questions get addressed. And, once an email thread gets this long, facts
stated early in the thread get lost, leading to the same questions being
asked multiple times.
I don't know what installed mbed but AFAIK I do not need it (it might have
been in the Edison toolchain, which I no longer use).
listusb output:
C:\nxp\MCUXpressoIDE_10.3.0_2200\ide\binaries\Scripts>listusb
VID: 0409 PID: 005A (Generic USB Hub)
VID: 045E PID: 00D1 (HID-compliant consumer control device)
VID: 045E PID: 00D1 (HID-compliant mouse)
VID: 045E PID: 00D1 (USB Input Device)
VID: 045E PID: 00DB (HID-compliant consumer control device)
VID: 045E PID: 00DB (HID Keyboard Device)
VID: 045E PID: 00DB (USB Composite Device)
VID: 045E PID: 00DB (USB Input Device)
VID: 045E PID: 00DB (USB Input Device)
VID: 0C45 PID: 6321 (USB Composite Device)
VID: 0C45 PID: 6321 (USB Video Device)
VID: 0CF3 PID: 311D (Qualcomm Atheros AR3012 Bluetooth 4.0 + HS Adapter)
Discovery is (and was) enabled for the following. The IDE finds the segger
probe but debug still does not work with that.
If I can prep the system for a new install, please let me know how to
thoroughly clean it up for that and how to install it in such a way that it
will work, including software missed by the installer.
- Jeff
On Thu, Feb 7, 2019 at 7:44 PM lpcxpresso_support <[email protected]>
- Mark as New
- Bookmark
- Subscribe
- Mute
- Subscribe to RSS Feed
- Permalink
- Report Inappropriate Content
Hi Jeff,
Apologies that there isn't a manual in place yet. This is a work in progress and behind the schedule we had wanted, but is on the way.
Let me provide some background to try and help:
- The LPC11U35 device on the board is the on-board debug probe, which is connected to the SWD port of the LPC1769 (it can also connect to a UART, but I will come back to that). This same design is used for a few different designs, LPCXpresso MAX boards and LPCXpresso CD boards being the main ones. The original LPCXpresso MAX boards were released with firmware image for the LPC11U35 that supported MBED mass storage operation, a VCOM port and a CMSIS-DAP probe. In this context I am talking about mass storage capabilities such that you can drag and drop code onto the TARGET MCU, not the LPC11U35.
- The MBED firmware image can be run on any of the designs using this LPC11U35 circuit, and will provide a CMSIS-DAP style debug interface and a VCOM port. However the mass storage functionality only supports the LPCXpresso812MAX and LPCXpresso824MAX boards (because none of the other boards are MBED enabled).
- Around the time that the OM13085 was introduced, we introduced a new firmware image for use with LPC11U35 debug probes like this. We did this to (1) remove confusion about the boards appearing to support MBED when they may not actually have that support, (2) to provide a much higher performance CMSIS-DAP and VCOM port implementation, and (3) to simplify VCOM port driver installation.
- To do the timing of the new debug firmware release and OM13085 introduction, several of the first few production runs of the board were programmed with the MBED firmware. While this still works, we recommend switching to the new firmware.
Now, what to do next:
You obviously got the LPC11U3x debug probe driver and firmware package (for other community users reading this, this firmware can be found by searching nxp.com with the term "LPC11U35 debug firmware" or at this link:Firmware and drivers for LPC11U35 debug probes). Now lets follow the steps to update that firmware and get the drivers in place.
- Unplug your board(s) and run the LPC11U3x driver installer (looks like you already did that).
- Hold down SW1 (reset) on your board and connect it to the host computer. Be sure to keep it held down until the board is fully plugged in. This puts the LPC11U35 into DFU (device firmware update) mode, so you can update its firmware in its internal flash memory.
- In a Windows file explorer window you will now see a mass storage device called CRP_DISABLD. Click on that drive and you will see a file called firmware.bin. Delete this file.
- Drag and drop the firmware.bin file that was contained in the zip file you downloaded (same one where you got that driver installer).
- Unplug and replug your board, but this time dont hold down SW1.
- Look at Windows device manager, and you should now see a VCOM port called NXP LPC11Uxx VCOM. There are other devices there too, but this is the easiest way to see the firmware is working.
Now when you try using MCUXpresso IDE to connect, it should find the board and you will see it have a name with CMSIS-DAP and LPC11U3x in the description. I recommend (at first) installing a fresh example (i.e. one you didnt already try to run) to keep things simple.
Now back to VCOM (for completeness):
The OM13085 board is a replacement for the original LPCXpresso V1 board, which we had to discontinue due to some parts on the board going EOL. That older board did not have a VCOM port, but was very popular and people were relying on the form factor and pin out, so we couldnt safely dedicated a UART to use for the VCOM port without potentially causing compatibility issues. So if you want to use the VCOM port you have to connect up the UART of the LPC1769 to the LPC11U35 by bridging R66 and R67 on the board.
Let us know how things go...
- Mark as New
- Bookmark
- Subscribe
- Mute
- Subscribe to RSS Feed
- Permalink
- Report Inappropriate Content
Hi,
Thank you very much for the history - that info is useful.
I had followed the flash procedure only a couple of steps in 'til fail.
Now I see a concrete evidence of the error. When I reset/power up the
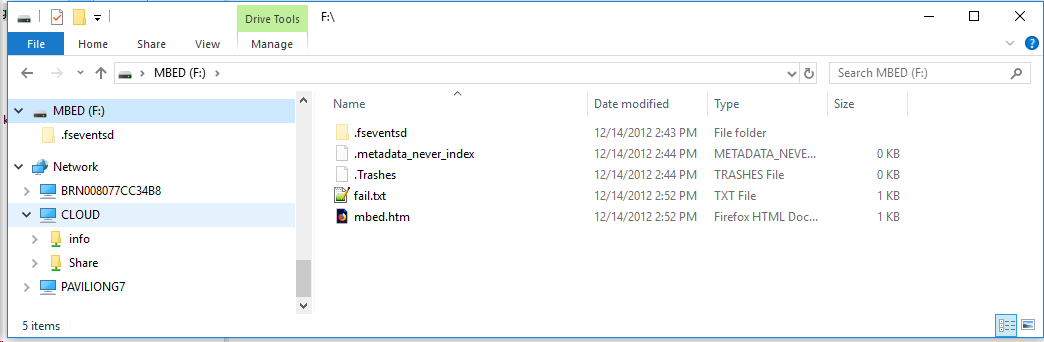
board, the mass storage device mounted is "MBED F:" so the remainder of the
procedure does not work. *And, this device is mounted whether or not I
press the reset button on power-up.* Previously I did not notice this mass
storage device because I thought it was coming from another USB device, and
was looking for a device of a different name related to the NXP board
anyway.
So, please advise on disabling/removing MBED, and proceeding from there...
Also, it might be a time-saver for both of us if you call my cell (in my
profile).
- Jeff
- Mark as New
- Bookmark
- Subscribe
- Mute
- Subscribe to RSS Feed
- Permalink
- Report Inappropriate Content
Hi Jeff,
You cannot "remove MBED" without getting your LPC11U35 into DFU mode. If an MBED device is appearing then the LPC11U35 is not going into this mode.
Either SW1 is broken on your board or you are not holding down the button for long enough / firmly while you plug / unplug your board.
Pressing SW1 without disconnecting / re-connecting power will reset the LPC1769 but will do nothing to the LPC11U35.
I cant see your cell phone in the profile so will need to contact out support admins to see about getting a replacement board to you if this doesnt work, but please try again - be very sure you are holding down SW1 firmly and disconnecting/reconnecting your board.
- Mark as New
- Bookmark
- Subscribe
- Mute
- Subscribe to RSS Feed
- Permalink
- Report Inappropriate Content
Hi Brendon,
I have always seen the same result powering up the board with S1 pressed.
The switch works, because the board boots into different behavior. After
releasing the switch after power-up with switch pressed the multi-led
flashes green continuously. After power-up without the switch pressed the
led is never on. Please be aware that the first symptom was the IDE not
recognizing the onboard probe when trying to start a debug session with a
small example appl. The board did recognize the segger probe and the IDE
displayed what looked like an attempt to flash something, but it was
fleeting. After that the IDE does not recognize the segger probe. This is
the first time I have used MCUXpresso and this board is the first NXP board
I have used, though I own at least one other for a separate appl. So, I am
still open the possibility I have made some mistake and/or there is trouble
in the dev box software. The machine is an HP Pavilion g series (not ideal
but available and seems sufficient), and the OS is a new, fresh WIN10Pro
install within the past 90 days or so.
I'm aware of that OS's built-in VCOM, which I use for other micros, but I
took your instructions to install the driver anyway as authoritative (I
asked about the Win10 VCOM install but did not get a reply). VCOM still
works with the other micros, which I definitely tested.
Unless there is some other recovery procedure, I will welcome receipt of a
replacement board - this is a big stopper. My board's silkscreen says "rev
D2 (C) 2017".
Please let me know what's next, of course,
Jeff
- Mark as New
- Bookmark
- Subscribe
- Mute
- Subscribe to RSS Feed
- Permalink
- Report Inappropriate Content
Hi Jeff,
I messaged you directly about returning your board and getting you a replacement.
The comments about J-link I had missed before. If you want to use the board with a J-link then you have to disabled the LPC11U35 first to ensure there is no conflict between them - this is done by inserting a jumper on JP3 before powering up the board, which holds the LPC11U35 in reset (note this also disables the VCOM functionality, and you wont see the MBED device either.)
I would recommend opening a new IDE workspace after doing that step in order to ensure there is no lingering debug session set up (you can clear these, but I suggest keeping things simple). The IDE should detect the J-link automatically.
Regards,
Brendon
- Mark as New
- Bookmark
- Subscribe
- Mute
- Subscribe to RSS Feed
- Permalink
- Report Inappropriate Content
Got it - thanks. I installed the jumper prior to using the segger probe (I
still did not successfully program or debug the board with it however - it
connected and dozed off - but the IDE enumerated it). And I have already
found out the hard way about persistent debug connections, in switching
between IDE instances (alternating between a test standard program in one
IDE instance and another program in another instance). It's good to hear
confirmation of that behavior, or related.
Thank you again,
Jeff
On Fri, Feb 15, 2019 at 1:51 PM brendonslade <[email protected]>
- Mark as New
- Bookmark
- Subscribe
- Mute
- Subscribe to RSS Feed
- Permalink
- Report Inappropriate Content
1. VCOM is a virtual serial port offered by the debug probe. After the device enumerates, Windows displays it as a COM port in the Device Manager. You use it for serial communication to the LPC1769. It is a separate endpoint than the one used for the debug channel.
2. You don't need to uninstall any drivers.
3. You mentioned this earlier. I can tell you I've made no modifications to my LPCXpresso1769 Rev. D.
If successful, the MCUXpresso IDE should find a probe with this description string: LPC11U3x CMSIS-DAP v1.0.7
The existing example projects for the LPC176x need to be imported from the file system. It's easiest to do this from the Quick Start menu since it opens the Examples folder by default. This is the location of the LPC176x project archive on my system:
C:\nxp\MCUXpressoIDE_10.3.0_2200\ide\plugins\com.nxp.mcuxpresso.tools.wizards_10.3.0.201810311031\Examples\Legacy\NXP\LPC1000\LPC17xx\LPCXpresso176x_cmsis2.zip
Thanks and regards,
MCUXpresso Support
- Mark as New
- Bookmark
- Subscribe
- Mute
- Subscribe to RSS Feed
- Permalink
- Report Inappropriate Content
Hi again,
Not having any success...
I installed the VCOM driver (LPC11Uxx_Debug_Probe_VCOM_v1.0.0.EXE). The
next step in the instructions is to plug in the board and check for a new
port - there is no new port. The device does show up in Explorer as MBED
(F:) however. That much seems normal, but I do not know. I built a
project and tried to debug it to see what the IDE might see - nothing. I
disabled the AV USB device scanning. And just in case, I tried powering up
the board with the reset switch pressed, with no visible effect. Is there
known to be interference between this driver and Atmel Studio's virtual USB
serial port driver?
Here is the result so far:
On Wed, Feb 6, 2019 at 2:05 PM lpcxpresso_support <[email protected]>
- Mark as New
- Bookmark
- Subscribe
- Mute
- Subscribe to RSS Feed
- Permalink
- Report Inappropriate Content
I'm not sure what's going on with your firmware update. If you hold the reset switch when you apply power to the board, you should see an Explorer window appear. Look for it. This is the mass storage device used for updating the firmware. You'll need to fool Explorer by deleting the firmware.bin file in the Explorer window. You can then simply drag and drop the firmware file at the link I provided to update the firmware. Cycle the power, and you're done. An extra step using the installer may be necessary for Windows 7-8. Nothing further to be done if Windows 10.
If you haven't done so already, I recommend you install the latest available release of MCUXpresso v10.3.0.
Thanks and regards,
MCUXpresso Support
- Mark as New
- Bookmark
- Subscribe
- Mute
- Subscribe to RSS Feed
- Permalink
- Report Inappropriate Content
Thanks for the fast response...
Before I proceed, I wish to confirm a few things please (so that I do not
end up in device driver heck). Please address all.
1. The pdf instructions in the download ball says this driver is not
required on Win10 boxes, which this box is. Is this driver then an NXP
replacement for the system-supplied VCOM driver?
2. Is removal of the extant VCOM driver required first? Or will the new
NXP driver just run alongside the extant VCOM driver? (sounds unlikely).
3. Is there a jumper (solder bridge) required on the board to enable the
new driver to actually function? I read in a posting in "the community"
that I must install a jumper but, again, there is no manual for the board.
If a jumper is required, I need to know where it is because, again, there
is no manual.
I did try to use a jlink probe and it connected with the IDE, but
download/debug of my blinky sample failed. I think I can save that issue
for SEGGER once the built-in probe works.
The update procedure looks easy enough but I am always inclined to confirm
things before I try things, especially when I see contradictions, in an
unfamiliar environment. I look forward to hearing back from you - I have a
lot of work for this this very cool little board to do...
Jeff
On Tue, Feb 5, 2019 at 10:45 PM lpcxpresso_support <[email protected]>
- Mark as New
- Bookmark
- Subscribe
- Mute
- Subscribe to RSS Feed
- Permalink
- Report Inappropriate Content
Your OM13085 still has the MBED firmware? Did you install the MBED serial driver? There's also a firmware update available, though I haven't installed it. The procedure here
Flashing and Installing the new firmware and drivers for LPC11U35 debug probes
should work for your board. Let us know how you get on.
Thanks and regards,
MCUXpresso Support
- Mark as New
- Bookmark
- Subscribe
- Mute
- Subscribe to RSS Feed
- Permalink
- Report Inappropriate Content
Thank you. Yes, I had installed the vcomm driver. But AFAIK the board upgrade procedure did not work as documented (holding the reset button during restart resulted in no action at all. When I released the reset button, I had a fast-blinking green led), but at least now the device shows up in device mgr. Without connectivity to the host, I don't see how it might work anyway. I had also scoured the internet for solutions for this problem, where I saw the requirement that a jumper be installed on the board in order for the newly installed driver to work, which led me to the need for board documentation. So, back to my original question, namely, is a manual or user guide for this board going to be released, so that I might find this jumper location?

(I don't know which MBED device belongs to which IDE).


Since my original post, I have reinstalled this IDE two more times, same problem remains. I am going to try a j-link, but the built-in debugger should work with a clean install, and it is my preference.
The box is Win10Pro x64. I run installers as administrator.
All further advice or recommendations will be gratefully received...