- Forums
- Product Forums
- General Purpose MicrocontrollersGeneral Purpose Microcontrollers
- i.MX Forumsi.MX Forums
- QorIQ Processing PlatformsQorIQ Processing Platforms
- Identification and SecurityIdentification and Security
- Power ManagementPower Management
- Wireless ConnectivityWireless Connectivity
- RFID / NFCRFID / NFC
- MCX Microcontrollers
- S32G
- S32K
- S32V
- MPC5xxx
- Other NXP Products
- S12 / MagniV Microcontrollers
- Powertrain and Electrification Analog Drivers
- Sensors
- Vybrid Processors
- Digital Signal Controllers
- 8-bit Microcontrollers
- ColdFire/68K Microcontrollers and Processors
- PowerQUICC Processors
- OSBDM and TBDML
- S32M
-
- Solution Forums
- Software Forums
- MCUXpresso Software and ToolsMCUXpresso Software and Tools
- CodeWarriorCodeWarrior
- MQX Software SolutionsMQX Software Solutions
- Model-Based Design Toolbox (MBDT)Model-Based Design Toolbox (MBDT)
- FreeMASTER
- eIQ Machine Learning Software
- Embedded Software and Tools Clinic
- S32 SDK
- S32 Design Studio
- GUI Guider
- Zephyr Project
- Voice Technology
- Application Software Packs
- Secure Provisioning SDK (SPSDK)
- Processor Expert Software
-
- Topics
- Mobile Robotics - Drones and RoversMobile Robotics - Drones and Rovers
- NXP Training ContentNXP Training Content
- University ProgramsUniversity Programs
- Rapid IoT
- NXP Designs
- SafeAssure-Community
- OSS Security & Maintenance
- Using Our Community
-
- Cloud Lab Forums
-
- Knowledge Bases
- ARM Microcontrollers
- i.MX Processors
- Identification and Security
- Model-Based Design Toolbox (MBDT)
- QorIQ Processing Platforms
- S32 Automotive Processing Platform
- Wireless Connectivity
- CodeWarrior
- MCUXpresso Suite of Software and Tools
- MQX Software Solutions
-
- Home
- :
- i.MX Forums
- :
- i.MX RT Crossover MCUs
- :
- MCU Boot utility connection with custom board - connection failure
MCU Boot utility connection with custom board - connection failure
- Subscribe to RSS Feed
- Mark Topic as New
- Mark Topic as Read
- Float this Topic for Current User
- Bookmark
- Subscribe
- Mute
- Printer Friendly Page
- Mark as New
- Bookmark
- Subscribe
- Mute
- Subscribe to RSS Feed
- Permalink
- Report Inappropriate Content
Hello Support team,
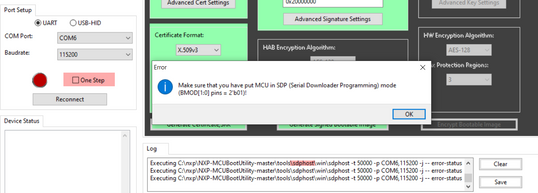
I am trying to connect the MCU boot utility with custom board via UART, but its not connecting. getting the error saying "Make sure that you have put MCU in SDP".
But I have made the boot mode configurations to 2'b01.
Attached image FYR.
Please suggest what could be issue.
Thank you.
Solved! Go to Solution.
- Mark as New
- Bookmark
- Subscribe
- Mute
- Subscribe to RSS Feed
- Permalink
- Report Inappropriate Content
- Mark as New
- Bookmark
- Subscribe
- Mute
- Subscribe to RSS Feed
- Permalink
- Report Inappropriate Content
Hi @Shiva-2022
I hope you are doing well.
I have seen in your picture that some BLHOST commands are being executed. But first the some SDPHOST commands need to be send, just to load the flashloader in internal SRAM. Then, flashloader will run and receive BLHOST commands.
Please disable one step check box and click on reconnect and share with me full debug log from the tool. Also, take a look at the below pointers to check:
-Is MCU being powered properly?
-Is VCOM correct?
-Did you reset or power cycled the MCU before entering serial downloader mode.
-Any previous fuse settings?
- If you debug by JTAG after setting serial mode . Where is the program counter?
-Do you have latest MCUboot Utility release?
Please let me know your results!
Diego
- Mark as New
- Bookmark
- Subscribe
- Mute
- Subscribe to RSS Feed
- Permalink
- Report Inappropriate Content
Hello Diego,
Thanks for the quick reply.
I have disabled the "One step" option in MCU utility and tried to reconect but the behaviour is same getting the same error as earlier.
Attached debug log from tool FYR.
Below are the answers for your points.
-Is MCU being powered properly?
Ans: Yes
-Is VCOM correct?
Ans: Yes
-Did you reset or power cycled the MCU before entering serial downloader mode.
Ans: Made the Boot mode configurations on switches and turned on MCU then started checking connection with board.
-Any previous fuse settings?
Ans: We didn't do any fuse settings.
- If you debug by JTAG after setting serial mode . Where is the program counter?
Ans: We have not tried with debugger. Please let us know which workspace to use for this purpose.
-Do you have latest MCUboot Utility release?
Ans: I have downloaded the MCUBoot utility tool from https://github.com/JayHeng/NXP-MCUBootUtility
FYI. We are using LPUART1 interface with MCU utility.
On our custom board we dont have any specific connector for connecting to UPART1, so we took LPUART1 Tx and Rx pinout and connected those wires to USB to UART tx and rx pins along with ground.
Please suggest your inputs.
Have a good day.
- Mark as New
- Bookmark
- Subscribe
- Mute
- Subscribe to RSS Feed
- Permalink
- Report Inappropriate Content
Hi @Shiva-2022
Thanks for your reply and for providing more information !
Regarding :We have not tried with debugger. Please let us know which workspace to use for this purpose.
You can use and stand alone debugger and any project. Here I halted the processor and read the PC. the address that I am reading commonly is related to bootROM execution.
Regarding: On our custom board we dont have any specific connector for connecting to UPART1, so we took LPUART1 Tx and Rx pinout and connected those wires to USB to UART tx and rx pins along with ground.
Good point , please double check that you are using the specific LPUART1 pins for your part. Below the ones for RT1064 as example.
Also, SDK examples will use the same LPUART1 interface than the bootloader. It will be good to check using an LPUART example from the SDK. Where you can see data printed and type data in using a serial terminal.
Another thing, if you got USB1 available you can try with this port as well, just to narrow down the issue further.
Best regards,
Diego.
- Mark as New
- Bookmark
- Subscribe
- Mute
- Subscribe to RSS Feed
- Permalink
- Report Inappropriate Content
Hello Diego,
Thank you.
We are able to connect with MCUBoot tool now.
And now we stuck in configure boot device.
When i click on configure boot device, getting the failure msg. Plz refer attached image.
I have done below configurations:
Boot mode: SDP 2'01b
Boot_cfg[7:4]: 1
Boot_cfg[7:4]: 111xb
Attached ext.NAND flash manual.
Also attached the boot device configuration in MCUboot tool.
Please suggest.
Thank you.
- Mark as New
- Bookmark
- Subscribe
- Mute
- Subscribe to RSS Feed
- Permalink
- Report Inappropriate Content
Hi @Shiva-2022
Thanks for your patience,
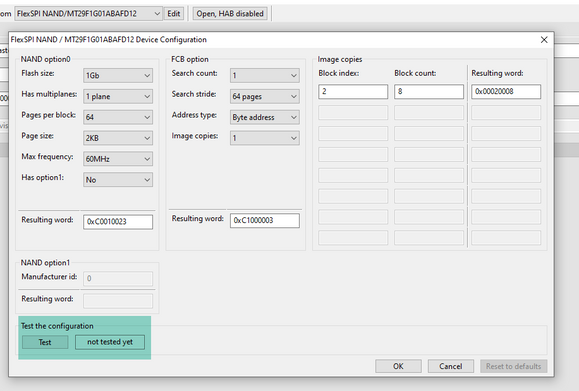
You can try to diagnose further by using our MCUXpresso Secure Provisioning tool ( version V5 added support for a NAND flash template)
I am recommending to use the tool to test your memory configuration (you can edit the default one for MT29F1xxx ), as you can see in the above image.
If you continue to have errors could you tell me which FlexSPI port are you using?
Best regards,
Diego
- Mark as New
- Bookmark
- Subscribe
- Mute
- Subscribe to RSS Feed
- Permalink
- Report Inappropriate Content
Hello Diego,
Thanks for the details.
As you suggested i have started using the Secure provisioning tool.
I am able to connect to target using via UART and made ext. flash configurations.
Tried to read the ext. memory i think it worked, showing the data as 0xff.
But when i try to erase or write its throwing error as invalid argument.
Please find the attached image FYR.
Your inputs helped and help in further debugging the issue.
Thank you so much.
Quick response is much appreciated
- Mark as New
- Bookmark
- Subscribe
- Mute
- Subscribe to RSS Feed
- Permalink
- Report Inappropriate Content
Hello Diego,
Firstly thank you so much, your inputs helped!
- Mark as New
- Bookmark
- Subscribe
- Mute
- Subscribe to RSS Feed
- Permalink
- Report Inappropriate Content
Hi @Shiva-2022
It is great that you where able to program your NAND flash memory!
Are you sure that you have the proper boot mode and boot config pin settings? Please refer to the RM description or our EVK description.
Best regards, and good luck!
Diego
- Mark as New
- Bookmark
- Subscribe
- Mute
- Subscribe to RSS Feed
- Permalink
- Report Inappropriate Content
Hello Diego,
Thanks for al the inputs.
all working as expected.
- Mark as New
- Bookmark
- Subscribe
- Mute
- Subscribe to RSS Feed
- Permalink
- Report Inappropriate Content


