
- Forums
- Product Forums
- General Purpose MicrocontrollersGeneral Purpose Microcontrollers
- i.MX Forumsi.MX Forums
- QorIQ Processing PlatformsQorIQ Processing Platforms
- Identification and SecurityIdentification and Security
- Power ManagementPower Management
- Wireless ConnectivityWireless Connectivity
- RFID / NFCRFID / NFC
- Advanced AnalogAdvanced Analog
- Neural Processing UnitsNeural Processing Units
- MCX Microcontrollers
- S32G
- S32K
- S32V
- MPC5xxx
- Other NXP Products
- S12 / MagniV Microcontrollers
- Powertrain and Electrification Analog Drivers
- Sensors
- Vybrid Processors
- Digital Signal Controllers
- 8-bit Microcontrollers
- ColdFire/68K Microcontrollers and Processors
- PowerQUICC Processors
- OSBDM and TBDML
- S32M
- S32Z/E
-
- Solution Forums
- Software Forums
- MCUXpresso Software and ToolsMCUXpresso Software and Tools
- CodeWarriorCodeWarrior
- MQX Software SolutionsMQX Software Solutions
- Model-Based Design Toolbox (MBDT)Model-Based Design Toolbox (MBDT)
- FreeMASTER
- eIQ Machine Learning Software
- Embedded Software and Tools Clinic
- S32 SDK
- S32 Design Studio
- GUI Guider
- Zephyr Project
- Voice Technology
- Application Software Packs
- Secure Provisioning SDK (SPSDK)
- Processor Expert Software
- Generative AI & LLMs
-
- Topics
- Mobile Robotics - Drones and RoversMobile Robotics - Drones and Rovers
- NXP Training ContentNXP Training Content
- University ProgramsUniversity Programs
- Rapid IoT
- NXP Designs
- SafeAssure-Community
- OSS Security & Maintenance
- Using Our Community
-
- Cloud Lab Forums
-
- Knowledge Bases
- ARM Microcontrollers
- i.MX Processors
- Identification and Security
- Model-Based Design Toolbox (MBDT)
- QorIQ Processing Platforms
- S32 Automotive Processing Platform
- Wireless Connectivity
- CodeWarrior
- MCUXpresso Suite of Software and Tools
- MQX Software Solutions
- RFID / NFC
- Advanced Analog
- Neural Processing Units
-
- NXP Tech Blogs
Dear NXP Team,
I have a question because an error occurred while testing ADC with s32k144 evaluation board.
When 2.5V was applied to ADC0 Channel 12 (PTC14) shown in the previous example code, it was
confirmed that the adcValue value was output close to 2.5 well.
The problem is that after changing to ADC1 Channel 1 (PTA3) and applying 2.5V, an incorrect value of
1.1 is being output.
When I checked it on the multimeter, I checked that it was 2.5V, but it was continuously confirmed that
the adcValue value was being output incorrectly around 1.1.
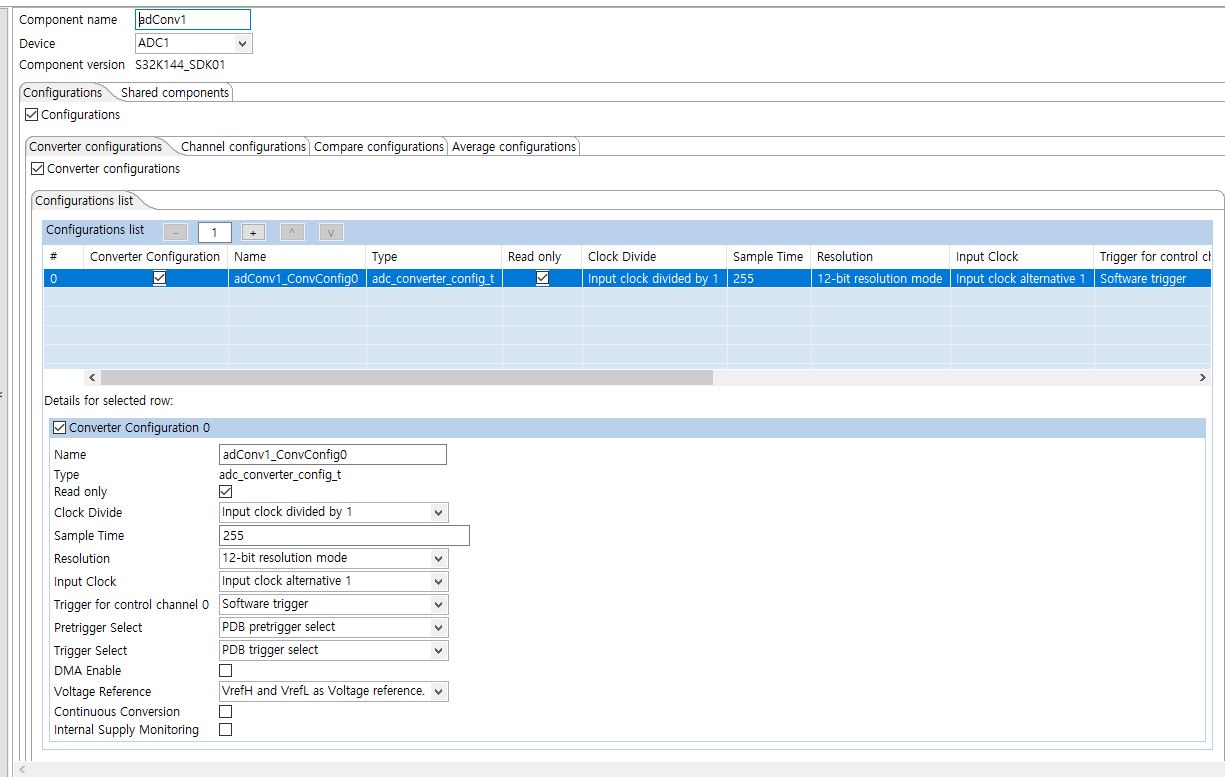
Below is that code. I've also attached the settings screen.
I'd appreciate it if you could let me know what's wrong with my setup and code.
Regards, DJ
/* Including needed modules to compile this module/procedure */
#include "Cpu.h"
#include "pin_mux.h"
#include "dmaController1.h"
#include "clockMan1.h"
#include "adConv1.h"
#include "lpuart1.h"
volatile int exit_code = 0;
/* User includes (#include below this line is not maintained by Processor Expert) */
/* Header file with some helper functions:
* - floatToStr: convert a floating point variable to a string
* - delayCycles: do nothing for a number of cycles
* See the header file for more information
*/
#include "helper_functions.h"
#include <string.h>
#include <stdint.h>
#include <stdbool.h>
/* This example is setup to work by default with EVB. To use it with other boards
please comment the following line
*/
#define EVB
#ifdef EVB
#define ADC_INSTANCE 0UL
#define ADC_CHN 1U
#define ADC_VREFH 5.0f
#define ADC_VREFL 0.0f
#else
#define ADC_INSTANCE 1UL
#define ADC_CHN 10U
#define ADC_VREFH 1.2f
#define ADC_VREFL 0.0f
#endif
#define welcomeStr "This is an ADC example, it will show you the value converted \
\r\nfrom ADC1 Input 11 (or ADC0 Input 12 for EVB )\r\n"
#define headerStr "ADC result: "
/* brief: Send a string to user via LPUART
* param sourceStr: pointer to the array of characters
* that you wish to send.
* return: None
*/
void print(const char *sourceStr)
{
uint32_t bytesRemaining;
/* Send data via LPUART */
LPUART_DRV_SendData(INST_LPUART1, (uint8_t *) sourceStr, strlen(sourceStr));
/* Wait for transmission to be successful */
while (LPUART_DRV_GetTransmitStatus(INST_LPUART1, &bytesRemaining)
!= STATUS_SUCCESS)
{
}
}
/*!
\brief The main function for the project.
\details The startup initialization sequence is the following:
* - startup asm routine
* - main()
*/
int main(void)
{
/* Enable the floating point unit */
enableFPU();
/* Write your local variable definition here */
/* Variables in which we store data from ADC */
uint16_t adcRawValue;
uint16_t adcMax;
volatile float adcValue;
/* Buffer used to store processed data for serial communication */
char msg[255] =
{ 0, };
/*** Processor Expert internal initialization. DON'T REMOVE THIS CODE!!! ***/
#ifdef PEX_RTOS_INIT
PEX_RTOS_INIT(); /* Initialization of the selected RTOS. Macro is defined by the RTOS component. */
#endif
/*** End of Processor Expert internal initialization. ***/
/* Write your code here */
/* For example: for(;;) { } */
/* Initialize and configure clocks
* - see clock manager component for details
*/
CLOCK_SYS_Init(g_clockManConfigsArr, CLOCK_MANAGER_CONFIG_CNT,
g_clockManCallbacksArr, CLOCK_MANAGER_CALLBACK_CNT);
CLOCK_SYS_UpdateConfiguration(0U, CLOCK_MANAGER_POLICY_AGREEMENT);
/* Initialize pins
* - See PinSettings component for more info
*/
PINS_DRV_Init(NUM_OF_CONFIGURED_PINS, g_pin_mux_InitConfigArr);
/* Get ADC max value from the resolution */
if (adConv1_ConvConfig0.resolution == ADC_RESOLUTION_8BIT)
adcMax = (uint16_t) (1 << 8);
else if (adConv1_ConvConfig0.resolution == ADC_RESOLUTION_10BIT)
adcMax = (uint16_t) (1 << 10);
else
adcMax = (uint16_t) (1 << 12);
/* Initialize LPUART instance
* - See LPUART component for configuration details
* If the initialization failed, break the program
*/
if (LPUART_DRV_Init(INST_LPUART1, &lpuart1_State, &lpuart1_InitConfig0)
!= STATUS_SUCCESS)
__asm("bkpt #255");
/* Configure and calibrate the ADC converter
* - See ADC component for the configuration details
*/
DEV_ASSERT(adConv1_ChnConfig0.channel == ADC_CHN);
ADC_DRV_ConfigConverter(ADC_INSTANCE, &adConv1_ConvConfig0);
ADC_DRV_AutoCalibration(ADC_INSTANCE);
/* Send a welcome message via LPUART */
print(welcomeStr);
/* Infinite loop:
* - Trigger a new conversion
* - Wait and get the result
* - Make the value more user friendly
* - Send the data to LPUART
*/
while (1)
{
/* Configure ADC channel and software trigger a conversion */
ADC_DRV_ConfigChan(ADC_INSTANCE, 0U, &adConv1_ChnConfig0);
/* Wait for the conversion to be done */
ADC_DRV_WaitConvDone(ADC_INSTANCE);
/* Store the channel result into a local variable */
ADC_DRV_GetChanResult(ADC_INSTANCE, 0U, &adcRawValue);
/* Process the result to get the value in volts */
adcValue = ((float) adcRawValue / adcMax) * (ADC_VREFH - ADC_VREFL);
/* And convert it to string */
// floatToStr(&adcValue, msg, 5);
//
// /* Send the result to the user via LPUART */
// print(headerStr);
// print(msg);
// print(" V\r\n");
/* Do nothing for a number of cycles */
// delayCycles(0x7FFFFF);
PINS_DRV_TogglePins(PTD, (1<<15));
delayCycles(0x7FFFFF);
}
/*** Don't write any code pass this line, or it will be deleted during code generation. ***/
/*** RTOS startup code. Macro PEX_RTOS_START is defined by the RTOS component. DON'T MODIFY THIS CODE!!! ***/
#ifdef PEX_RTOS_START
PEX_RTOS_START(); /* Startup of the selected RTOS. Macro is defined by the RTOS component. */
#endif
/*** End of RTOS startup code. ***/
/*** Processor Expert end of main routine. DON'T MODIFY THIS CODE!!! ***/
for(;;) {
if(exit_code != 0) {
break;
}
}
return exit_code;
/*** Processor Expert end of main routine. DON'T WRITE CODE BELOW!!! ***/
} /*** End of main routine. DO NOT MODIFY THIS TEXT!!! ***/
/* END main */
/*!
** @}
*/
/*
** ###################################################################
**
** This file was created by Processor Expert 10.1 [05.21]
** for the Freescale S32K series of microcontrollers.
**
** ###################################################################
*/
已解决! 转到解答。
I checked your configuration, there should be no problem, but I may know the cause of the problem.
1.How do you apply 2.5V to the PTA3 pin? Have you considered the reference voltage?

You can connect the PTA3 pin and PTC14 pin, and use the same configuration as the PTC14 in the example, and then verify that the sampling result of PTA3 is the same as that of PTC14. If it is the same, this can indicate that the cause of the problem is caused by the voltage you applied to the PTA3 port, and the reason is the reference voltage problem.
BR!
Jim,
I checked your configuration, there should be no problem, but I may know the cause of the problem.
1.How do you apply 2.5V to the PTA3 pin? Have you considered the reference voltage?
You can connect the PTA3 pin and PTC14 pin, and use the same configuration as the PTC14 in the example, and then verify that the sampling result of PTA3 is the same as that of PTC14. If it is the same, this can indicate that the cause of the problem is caused by the voltage you applied to the PTA3 port, and the reason is the reference voltage problem.
BR!
Jim,