
- Forums
- Product Forums
- General Purpose MicrocontrollersGeneral Purpose Microcontrollers
- i.MX Forumsi.MX Forums
- QorIQ Processing PlatformsQorIQ Processing Platforms
- Identification and SecurityIdentification and Security
- Power ManagementPower Management
- Wireless ConnectivityWireless Connectivity
- RFID / NFCRFID / NFC
- Advanced AnalogAdvanced Analog
- Neural Processing UnitsNeural Processing Units
- MCX Microcontrollers
- S32G
- S32K
- S32V
- MPC5xxx
- Other NXP Products
- S12 / MagniV Microcontrollers
- Powertrain and Electrification Analog Drivers
- Sensors
- Vybrid Processors
- Digital Signal Controllers
- 8-bit Microcontrollers
- ColdFire/68K Microcontrollers and Processors
- PowerQUICC Processors
- OSBDM and TBDML
- S32M
- S32Z/E
-
- Solution Forums
- Software Forums
- MCUXpresso Software and ToolsMCUXpresso Software and Tools
- CodeWarriorCodeWarrior
- MQX Software SolutionsMQX Software Solutions
- Model-Based Design Toolbox (MBDT)Model-Based Design Toolbox (MBDT)
- FreeMASTER
- eIQ Machine Learning Software
- Embedded Software and Tools Clinic
- S32 SDK
- S32 Design Studio
- GUI Guider
- Zephyr Project
- Voice Technology
- Application Software Packs
- Secure Provisioning SDK (SPSDK)
- Processor Expert Software
- Generative AI & LLMs
-
- Topics
- Mobile Robotics - Drones and RoversMobile Robotics - Drones and Rovers
- NXP Training ContentNXP Training Content
- University ProgramsUniversity Programs
- Rapid IoT
- NXP Designs
- SafeAssure-Community
- OSS Security & Maintenance
- Using Our Community
-
- Cloud Lab Forums
-
- Knowledge Bases
- ARM Microcontrollers
- i.MX Processors
- Identification and Security
- Model-Based Design Toolbox (MBDT)
- QorIQ Processing Platforms
- S32 Automotive Processing Platform
- Wireless Connectivity
- CodeWarrior
- MCUXpresso Suite of Software and Tools
- MQX Software Solutions
- RFID / NFC
- Advanced Analog
- Neural Processing Units
-
- NXP Tech Blogs
- Home
- :
- 汎用マイクロコントローラ
- :
- LPCマイクロコントローラ
- :
- Re: LPC55S69-EVK SEGGER JLink Flashing Problem
LPC55S69-EVK SEGGER JLink Flashing Problem
- RSS フィードを購読する
- トピックを新着としてマーク
- トピックを既読としてマーク
- このトピックを現在のユーザーにフロートします
- ブックマーク
- 購読
- ミュート
- 印刷用ページ
LPC55S69-EVK SEGGER JLink Flashing Problem
- 新着としてマーク
- ブックマーク
- 購読
- ミュート
- RSS フィードを購読する
- ハイライト
- 印刷
- 不適切なコンテンツを報告
I used LPCScrypt to flash the newest SEGGER JLink Firmware for NXP on the LPC55S69-EVK. Unfortunately, it seems that in certain projects something goes wrong and parts of the flash get overwritten (whilie the exact same project is working when flashed on a board with original Link2 debugger). I slightly modified an SDK example project that should demonstrate the behaviour. It consists of three binaries: The first secure binary just jumps to the second secure binary, the second binary configures trustzone and then jumps to the non-secure application (these are the SDK examples,
The binaries are located in the flash as following:
First Binary: 0x10000000 – 0x10010000
Second Binary: 0x10011000 – 0x10027c00
Second Binary Veneer Table: 0x10072c00-0x28000
Third binary: 0x28000-0x38000
All three projects have a launch script for the Link2 and for the JLink. When I use a Link2-Board, everything is working. However, when I use a LPC55S69-EVK with the JLink as debugging firmware, the first projects can be flashed and runs. The second binary is also flashed correct to location 0x1028000 but overwrites the contents of the first binary from 0x10000000. When I read out the memory afterwards, the flash area of the first binary contains 0xFF and at one point (0x10007c00) the veneer table. According to the Memory Regions and Linker Script, the veneer table should be located at 0x10027c00 so it seems as if it is just shifted by exactly 0x20000.
From this state, it is not possible to recover, I.e. flashing the first binary again does not have any effect, the flash at 0x10000000 stays 0xFF. The only way to recover the board is then to mass erase the flash with jumper J10 connected.
- 新着としてマーク
- ブックマーク
- 購読
- ミュート
- RSS フィードを購読する
- ハイライト
- 印刷
- 不適切なコンテンツを報告
Hello Simon,
I've gone ahead and tested the same example using both J-Link and CMSIS-DAP(which comes on originally on the link2 debugger).
For the J-Link I've done the following steps:
On the Getting Started with LPC-Link 2 page it mentions that we have to manually update the binary on the following folders located in the PC:
- To make sure that LPCscrypt uses the latest LPC-Link2 firmware, please replace the J-Link firmware images located in:
- LPCScrypt_InstallDir\probe_firmware\LPCXpressoV2\ and
- LPCScrypt_InstallDir\probe_firmware\LPCLink2\
I have downloaded the NXP Link 2 Jlink OB Firmware the second option that is the LPCXPresso On Board.

Once I updated the binary from the LPCScrypt, I put the board in DFU mode and selected "program_JLINK".
I then deleted the debug sessions from the example and pressed the debug icon again. I compared the memory configuration from both debug sessions and it is resulting in the same configuration for the veneer table.
Can you please confirm if you have done the same steps to update with the Segger J-Link?
Best Regards,
Sabina
- 新着としてマーク
- ブックマーク
- 購読
- ミュート
- RSS フィードを購読する
- ハイライト
- 印刷
- 不適切なコンテンツを報告
Yes I followed these steps. What do you mean by "compare memory configuration"? Were you able to flash all three binaries and do all of them work as expected? Because the first binary works fine for me, but when I flash the second binary, the problem occurs and the projects don't run anymore.
- 新着としてマーク
- ブックマーク
- 購読
- ミュート
- RSS フィードを購読する
- ハイライト
- 印刷
- 不適切なコンテンツを報告
Hi Simon
I misunderstood your initial binaries for the original memory configuration from the examples directly downloaded from the SDK. Can you check the location of the second binary you are flashing it to in MCUXpresso using the GUI Flash Tool? When I tested yours with the configurations you provided I could see that the first two both were being flashed at the same base address.
Best Regards,
Sabina
- 新着としてマーク
- ブックマーク
- 購読
- ミュート
- RSS フィードを購読する
- ハイライト
- 印刷
- 不適切なコンテンツを報告
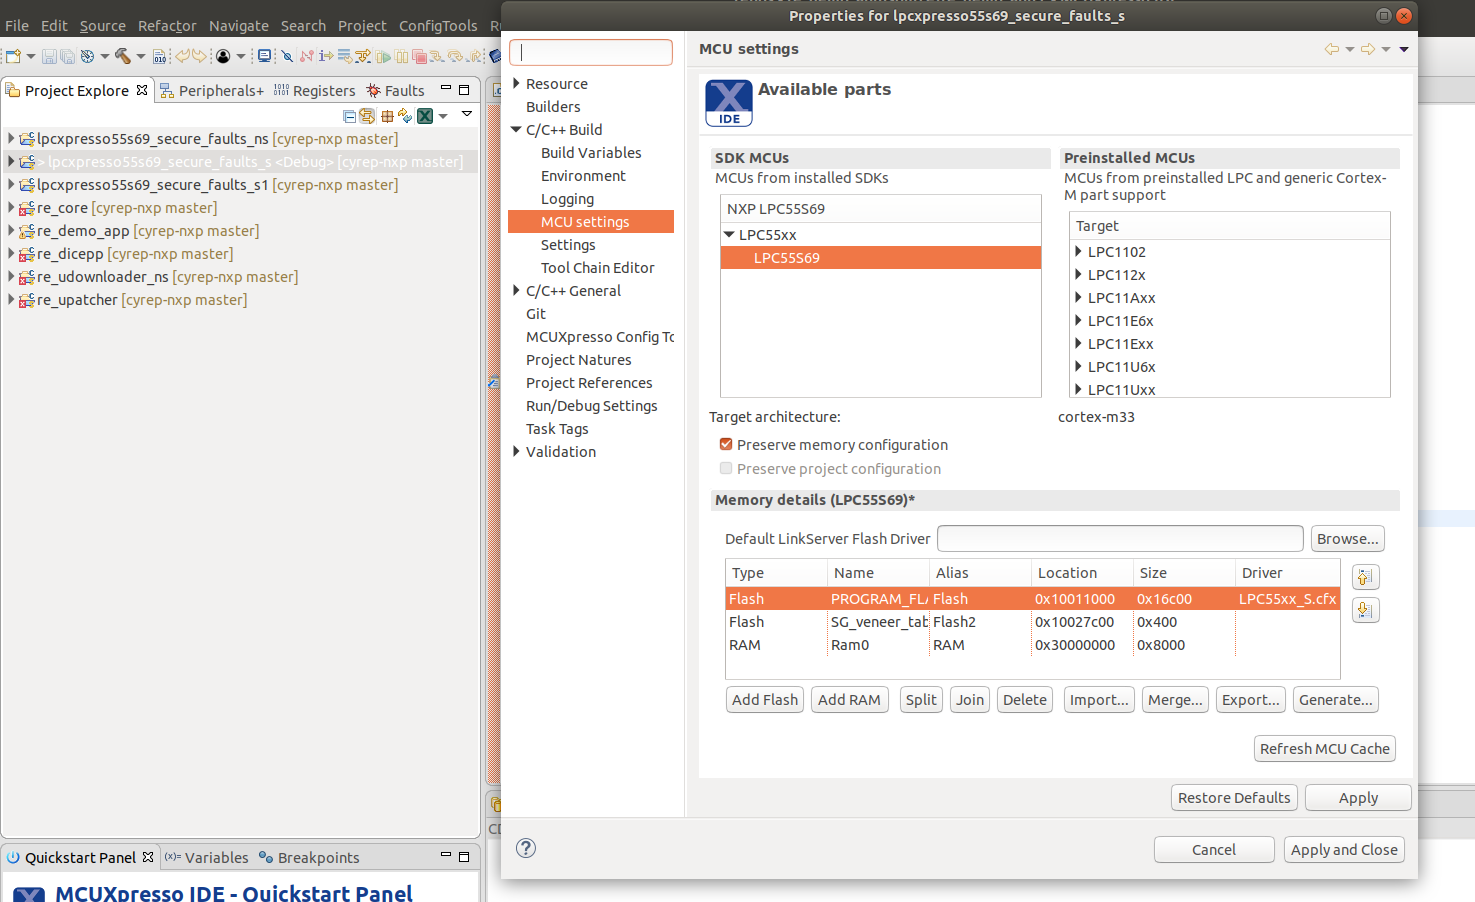
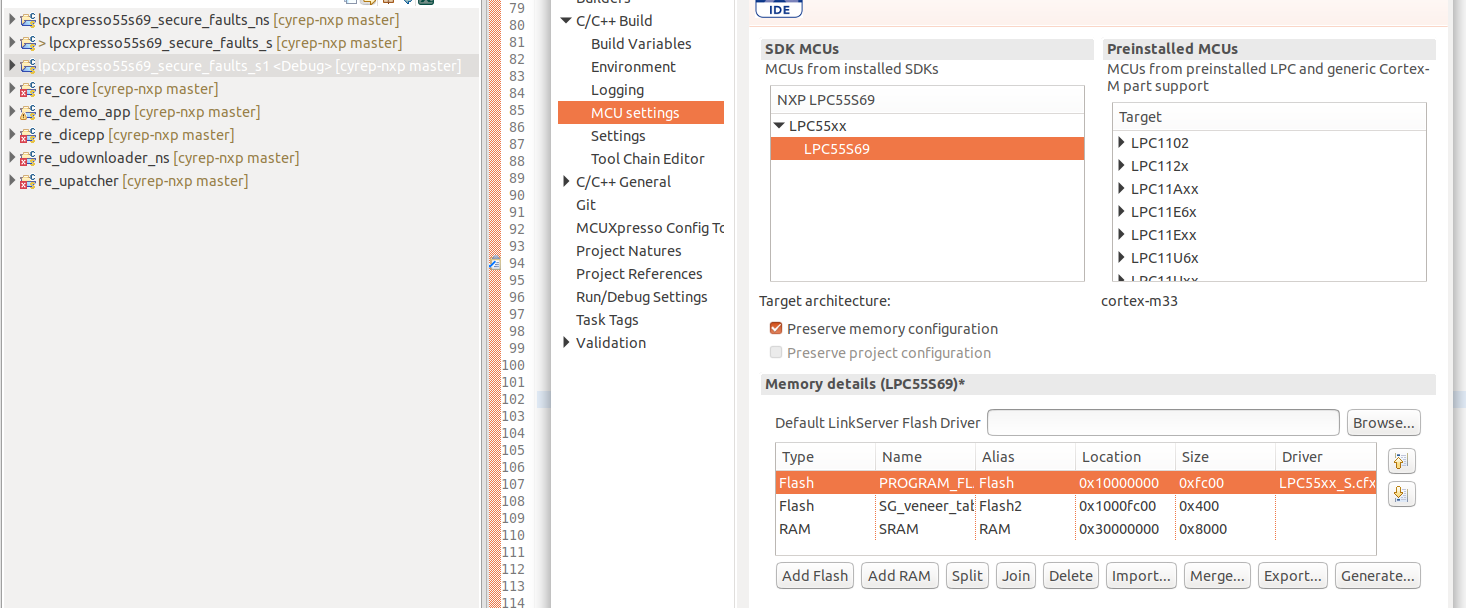
This is strange. I downloaded my zip-archive, imported it into the MCUXpresso IDE and checked the configuration in the project settings and the GUI flash tool. Both are correct (project 1 at 0x10000000 and project 2 at 0x10011000). I attached screenshots to demonstrate the behaviour from the project settings and the GUI flash tool.
- 新着としてマーク
- ブックマーク
- 購読
- ミュート
- RSS フィードを購読する
- ハイライト
- 印刷
- 不適切なコンテンツを報告
Hi Simon,
Sorry for delayed response. I have new information on what may be gonig on here.
Could you please make sure that this checkbox is not selecteded.

And also this driver is chosen.

Please try this as with the testing with this the first binary is not getting erased.
Let me know if this works for you.
Best Regards.
- 新着としてマーク
- ブックマーク
- 購読
- ミュート
- RSS フィードを購読する
- ハイライト
- 印刷
- 不適切なコンテンツを報告
Hello Sabina,
unfortunately I don't recognize this GUI, which program is this? So far, I was trying to flash/debug with the newest version of the MCUXpresso IDE or flash directly with the JLinkCommander CLI.
- 新着としてマーク
- ブックマーク
- 購読
- ミュート
- RSS フィードを購読する
- ハイライト
- 印刷
- 不適切なコンテンツを報告
Hi Simon,
Sorry for the delayed response, I have been going over this and so far I've not been successful in getting a solid answer for this. Right now I was able to find a reported bug with the segger j-link and the lpc55s69. This report states that there is a secure bit being masked out when using the j-link and causes unexpected behavior while debugging.
I am waiting to get confirmation on this topic, to see if this is in fact a bug with the j-link or another cause.
Thanks in advance for your patience, I will update you as soon as I can.
Regards,
Sabina